ENDE

The #1 VPN Client for Mac, iPhone & iPad

The #1 VPN Client for Mac, iPhone & iPad

Blog
Skip to main content
VPN Tracker Manual

Install VPN Tracker 365 – VPN for macOS Tahoe

By Team equinuxJune 27, 2025No Comments
Looking for a reliable VPN for macOS Tahoe? VPN Tracker 365 is the leading VPN client for Mac, designed to help professionals and businesses securely connect to their networks. Whether you’re working remotely or managing multiple VPN connections, VPN Tracker 365 provides advanced features, top-tier security, and full compatibility with macOS 26 Tahoe.

How to Install VPN Tracker 365 – VPN for macOS Tahoe

In this guide, we’ll walk you through the step-by-step installation process for VPN Tracker 365 on macOS Tahoe. You’ll learn how to download the app, complete the setup, and start using your VPN connections with confidence — all optimized for the latest macOS release.


Step 1 – Download VPN Tracker 365 for macOS Tahoe

Download the latest version of VPN Tracker 365 for Mac from the VPN Tracker 365 website.


Please note: The initial installation of VPN Tracker requires administrative privileges. Once installed following these instructions, the app can be used without admin access.


Step 2 – Install VPN Tracker 365 on macOS Tahoe
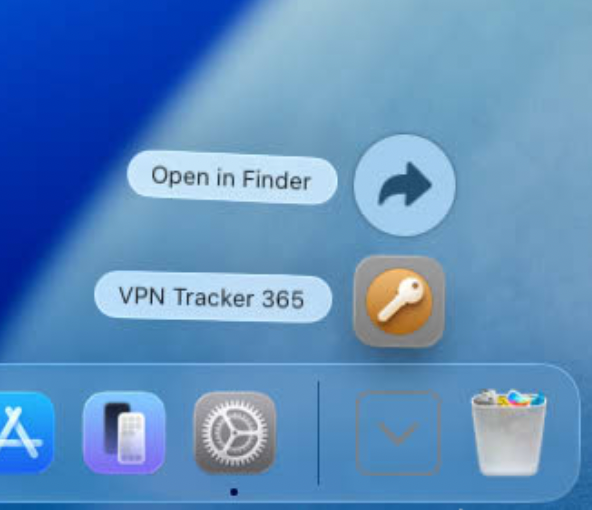
 

Open the App

Once downloaded, click on the VPN Tracker 365 Icon in your Downloads Folder:

An app installation window on macOS 26 Tahoe displays options for VPN Tracker 365. "Open in Finder" and "VPN Tracker 365" are visible, along with an icon showing a key, indicating the app's function as a VPN for macOS Tahoe.
Click on the VPN Tracker 365 Icon in your Downloads Folder


Open and Grant Access for VPN on macOS Tahoe

A security warning dialog box on macOS 26 Tahoe asks the user to confirm opening "VPN Tracker 365," an app downloaded from the internet. The text states Safari downloaded the file today at 08:01 and Apple checked it for malicious software, detecting none. This is part of the VPN macOS Tahoe installation process.

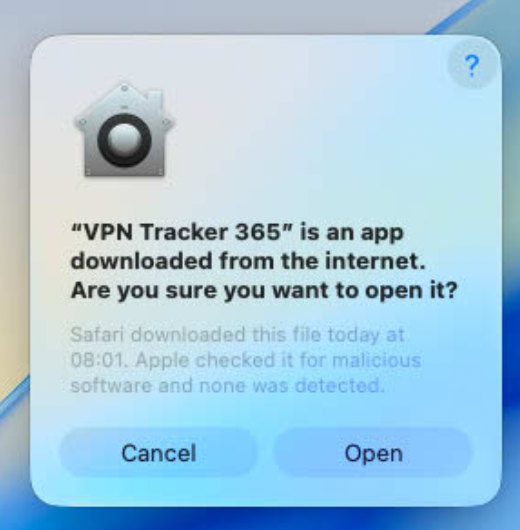
The system will asks you if you want to open the downloaded app. Confirm by pressing "Open"

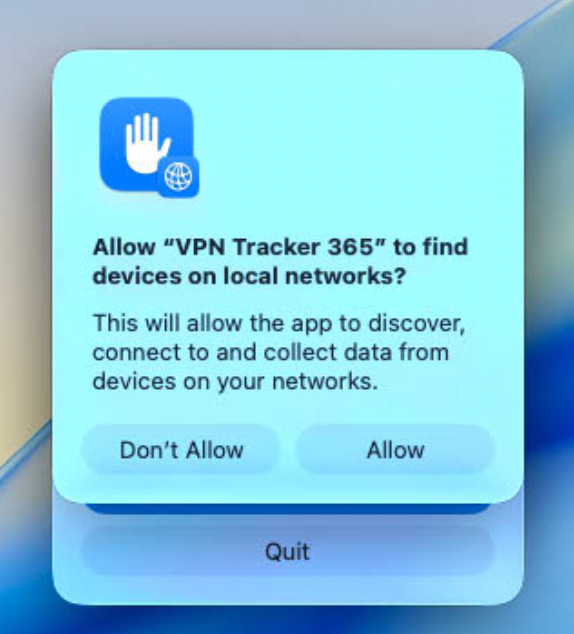
Next the system will ask you to Allow VPN Tracker 365 to find devices on local networks. Please press Allow so VPN Tracker can access your Network.

A blue pop-up window on macOS 26 Tahoe during the VPN Tracker 365 installation asks for permission to "Allow 'VPN Tracker 365' to find devices on local networks?" The description explains this allows the app to discover, connect to, and collect data from devices on networks, which is a common requirement for a VPN macOS Tahoe application. The options are "Don't Allow" and "Allow".

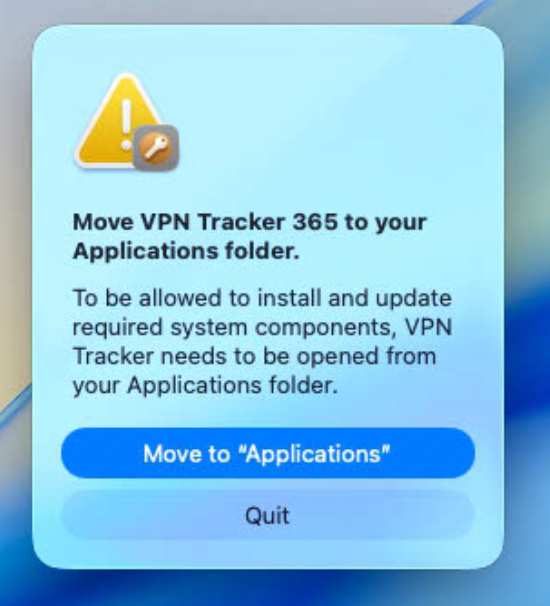
Move VPN Tracker to Applications on macOS Tahoe

In Order for VPN Tracker to work correctly, it needs to be moved to your Applications folder. Confirm the move by clicking on: Move to "Applications"

In the next step enter your password to confirm the move.

A pop-up warning on macOS 26 Tahoe prompts the user to "Move VPN Tracker 365 to your Applications folder." The explanation states that moving the app is necessary for it to install and update required system components, a typical step for a VPN macOS Tahoe application. An alert icon with a key is displayed at the top. The available options are "Move to 'Applications'" and "Quit."

Step 3 – Install the VPN Engine for macOS Tahoe

Next VPN Tracker will need to install the VPN Engine.

Important: This step must be completed on the machine. It cannot be done remotely (i.e. via Remote Desktop)

Step 1 – Install VPN Engine Helper

A macOS 26 Tahoe installation screen for VPN Tracker 365, labeled "Step 1 of 3," welcomes the user and explains that "VPN Tracker will install a VPN engine in order to secure and encrypt your connections." It also instructs the user to enter their Mac's password in the next step. An icon featuring a key on an orange circle is displayed on the left, emphasizing its function as a VPN for macOS Tahoe. "Cancel" and "Continue" buttons are at the bottom right.

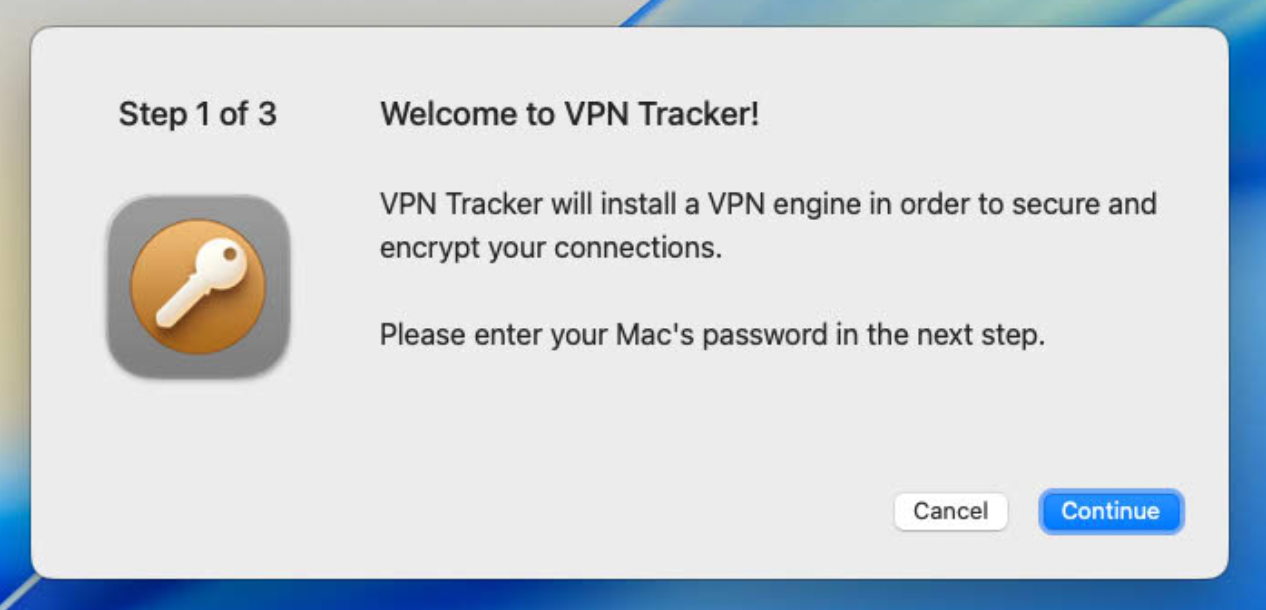
Press Continue to start the installation of your VPN Engine

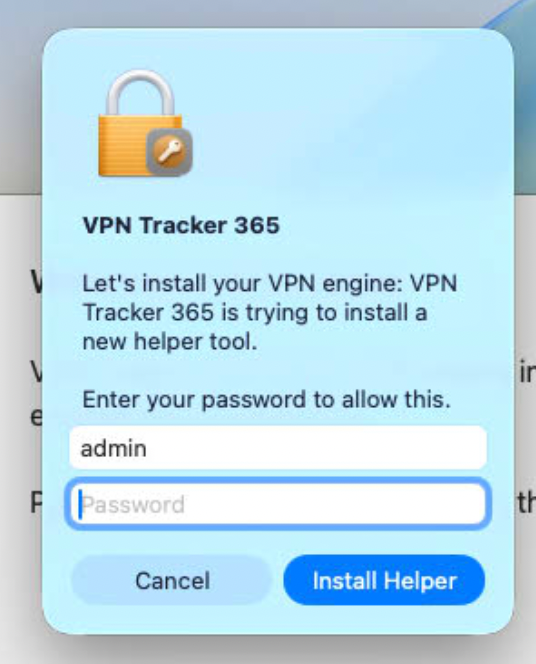
Enter your password to confirm the Installation of the VPN Engine Helper and click Install Helper

A macOS 26 Tahoe security prompt for VPN Tracker 365, prominently featuring an orange padlock icon with a key, requests the user to "Enter your password to allow this." It states, "Let's install your VPN engine: VPN Tracker 365 is trying to install a new helper tool." The username "admin" is pre-filled, and a "Password" input field is present below it. This is a crucial step for setting up the VPN macOS Tahoe. Options "Cancel" and "Install Helper" are at the bottom.

Step 2 – Allow System Extension

A macOS 26 Tahoe installation screen, "Step 2 of 3: Network Extension Setup," displays instructions for enabling the VPN Tracker 365 network extension. On the left, a key icon in an orange circle is visible. The main part of the screen shows a simulated view of "Login Items & Extensions" in System Settings, with "Network Extensions" explained and a toggle switch for "VPN Tracker 365 System Extension" circled to highlight its disabled state. The text below instructs the user to navigate to System Settings > General > Login Items & Extensions, click the information icon next to "Network Extensions," and enable the toggle for "VPN Tracker 365" to allow the VPN macOS Tahoe functionality. Buttons for "Learn more...", "Cancel", and "Open System Settings" are at the bottom.

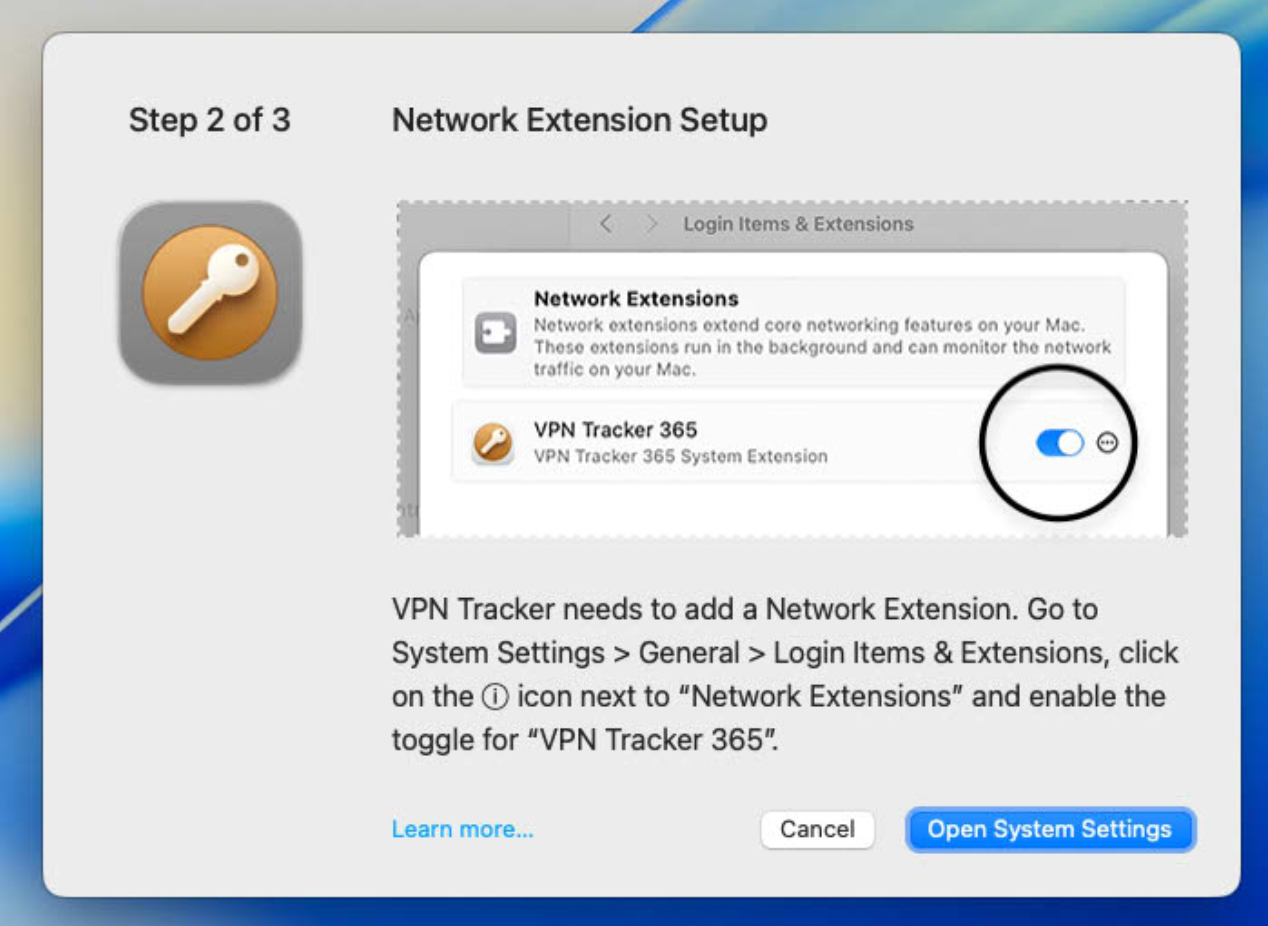
VPN Tracker needs to add a System Extension to your Mac in order to function properly. This needs to be approved by you before being allowed to use the app.

Click on Open Security Settings to open up Settings.

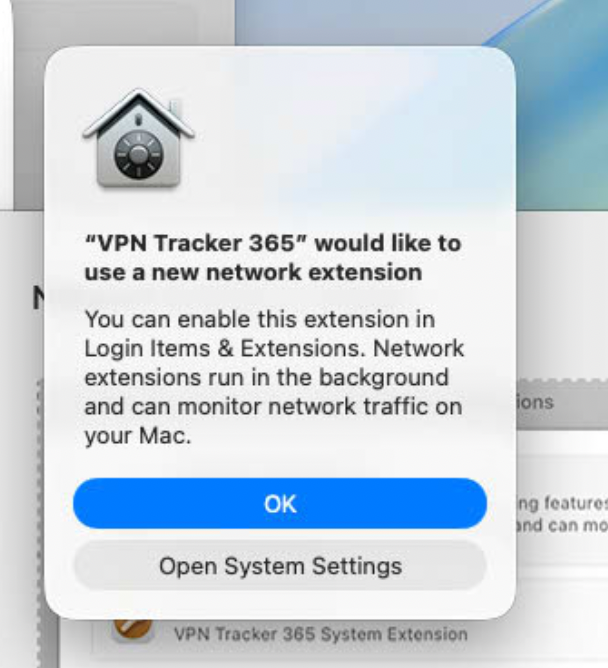
The system will ask you if you want to use a new network extension. Press OK to confirm.

A macOS 26 Tahoe pop-up window, topped with a house icon featuring a dial, informs the user that "VPN Tracker 365" would like to use a new network extension. The text explains that the extension can be enabled in "Login Items & Extensions," runs in the background, and can monitor network traffic, which is essential for a VPN macOS Tahoe. The user has options to click "OK" or "Open System Settings."

A screenshot from macOS 26 Tahoe shows the "Login Items & Extensions" section within System Settings. A pop-up window highlights "Network Extensions," with "VPN Tracker 365 System Extension" listed below it. The toggle switch for "VPN Tracker 365" is in the "on" (blue) position, indicating that the VPN macOS Tahoe extension has been enabled. A "Done" button is visible at the bottom of the pop-up. The left sidebar of System Settings is partially visible, showing options like Wi-Fi, Bluetooth, Network, and General.

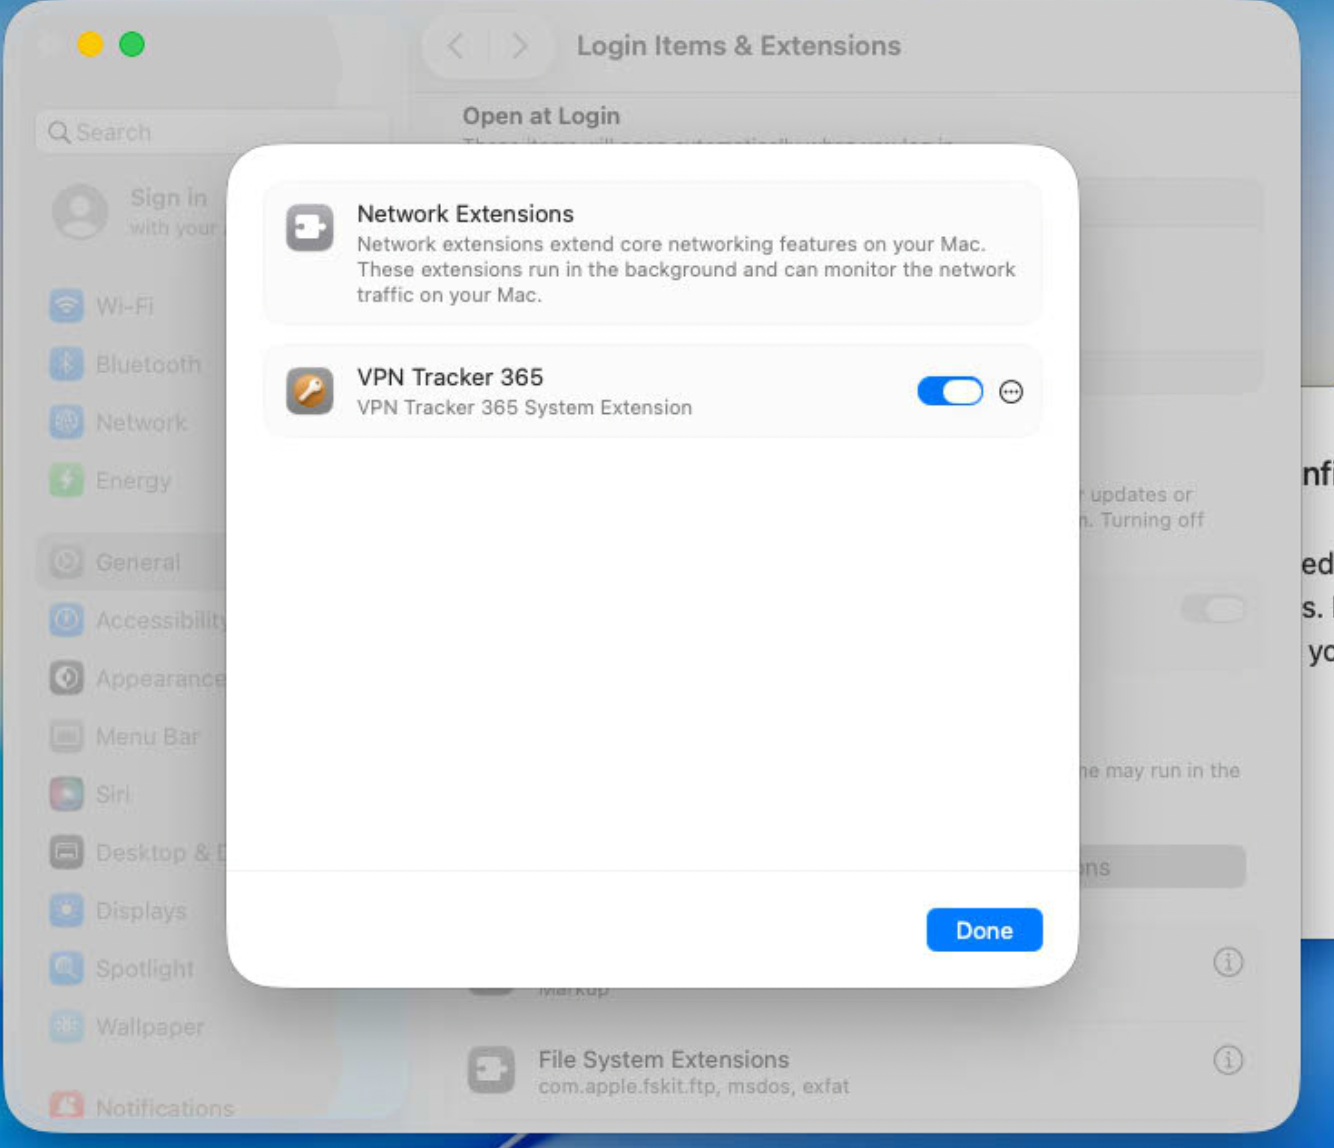
Flip the Switch next to VPN Tracker 365 so it goes from grey to blue.

Enter your password to confirm. Once the switch is blue you can press Done.

Close the settings window.

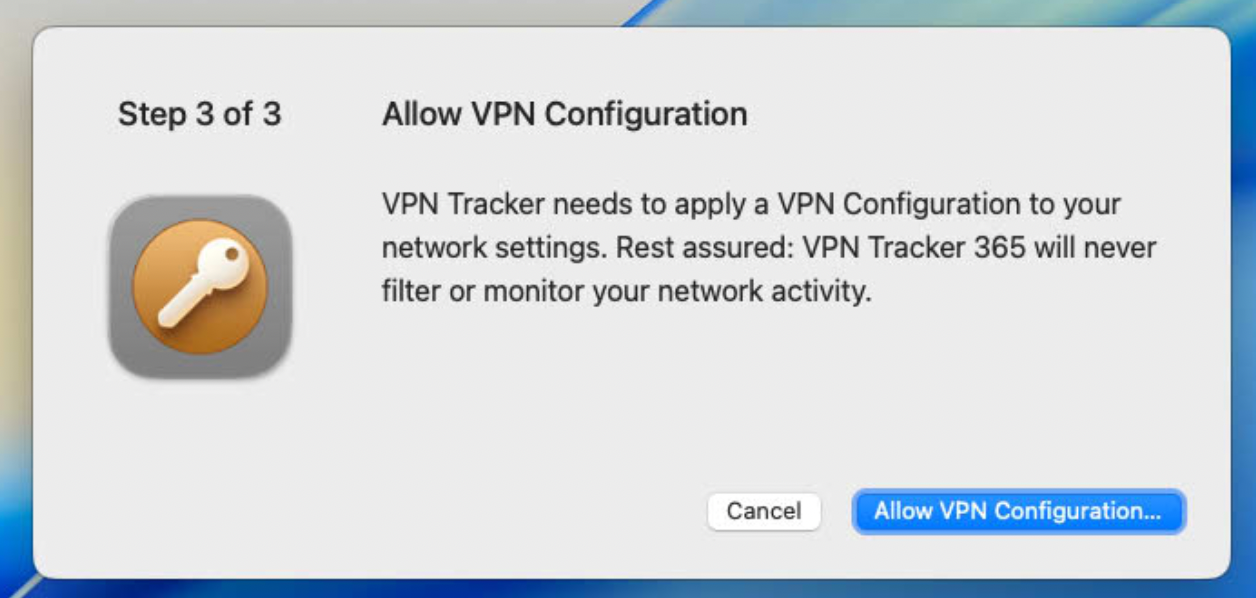
Step 3 – Allow VPN Configuration

VPN Tracker needs to apply a VPN Configuration to your Mac. Click on Allow VPN Configurations to start.

A macOS 26 Tahoe installation screen, "Step 3 of 3: Allow VPN Configuration," for VPN Tracker 365 is displayed. On the left, an orange circle icon with a white key is visible. The text states, "VPN Tracker needs to apply a VPN Configuration to your network settings. Rest assured: VPN Tracker 365 will never filter or monitor your network activity." This explains a crucial step for the VPN macOS Tahoe setup. At the bottom right, there are "Cancel" and "Allow VPN Configuration..." buttons.

A macOS 26 Tahoe pop-up window, featuring a purple circular icon with a white inner circle, asks the user if "VPN Tracker 365" would like to add VPN Configurations. The accompanying text warns, "All network activity on this Mac may be filtered or monitored when using VPN," which is a standard disclosure for a VPN macOS Tahoe application. The user is presented with "Allow" and "Don't Allow" buttons.

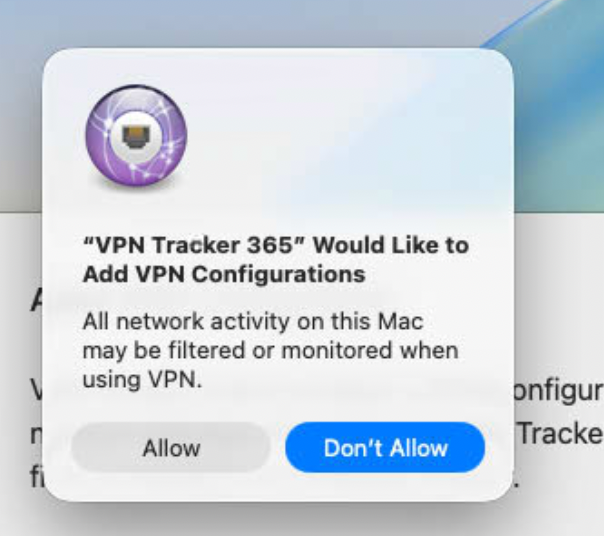
In the Window that opens, press on "Allow"

You're all set! VPN Tracker is successfully installed.

Next Steps

Continue by signing in, or creating an account.

Here are some additional Articles to get you started:

Leave a Reply

Privacy-Settings / Datenschutz-Einstellungen