About SonicWall Next-Generation Firewalls
SonicWall Next Generation Firewalls offer security-conscious business users high performance protection for their network.
These powerful VPN firewalls come in many shapes and sizes with a diverse spec designed to suit a range of use cases, from private home office and small business users to branch offices, all the way up to enterprise and data center level. A sleek black design combined with essential security features, including a practical, cloud-based central management system for easier day-to-day management makes the series an attractive choice.
Jump to:
- SonicWall Firewall models
- SonicWall TZ270 tech specs
- SSL vs IPsec
- Adding users
- Configuring IPsec
- Configuring SSL
- Share SonicWall VPN connection with team members
On this page, we take you through the key VPN specification for the TZ270, as well as all you need to know about setting up an IPsec or SSL VPN tunnel on your SonicWall firewall and connect on Mac, iPhone or iPad.
SonicWall Next-Generation Firewall Models
This guide specifically relates to SonicWall gateways using SonicOS 7 firmware or newer:
- SonicWall TZ Series: TZ270(W), TZ370(W), TZ470(W), TZ570(W), TZ670
- SonicWall NSa Series: NSa 2700, NSa 3700, NSa 4700, NSa 6700
- SonicWall NSsp Series: NSsp 13700, NSsp 15700
- SonicWall NSv Series: NSv 270, NSv 470, NSv 870
Don't see your device? If you are using a SonicWall device with an older firmware version, please consult our legacy guides:
IPsec vs SSL VPN
When it comes to VPN, SonicWall firewall users have the choice between IPsec and SSL, both of which are fully supported in VPN Tracker for Mac and iOS.
Generally, we would recommend using IPsec VPN wherever possible, as it provides faster connection speeds and is more stable. However, SSL VPN is compatible in more network locations - making it a good fallback choice when IPsec is not available (i.e. due to network restrictions.) Overall, both standards are considered equally secure for your business.
This guide explains step-by-step how to configure both IPsec and SSL VPN on your SonicWall firewall, as well as how to set up your VPN in VPN Tracker and get connected on Mac, iPhone and iPad.
First step: Add VPN users to your SonicWall firewall
Before you get start setting up your VPN tunnel, you’ll need to add VPN users to the firewall. These are the users who will have access to the VPN once it has been configured (i.e. members of staff.)
Please note, each user you add here will have their own unique username and password which will be required later to access the VPN.
- Log into the web interface of your SonicWall firewall and go to the Device tab and in the sidebar menu, go to Users > Local Users & Groups
- Click Add User to configure a new VPN user
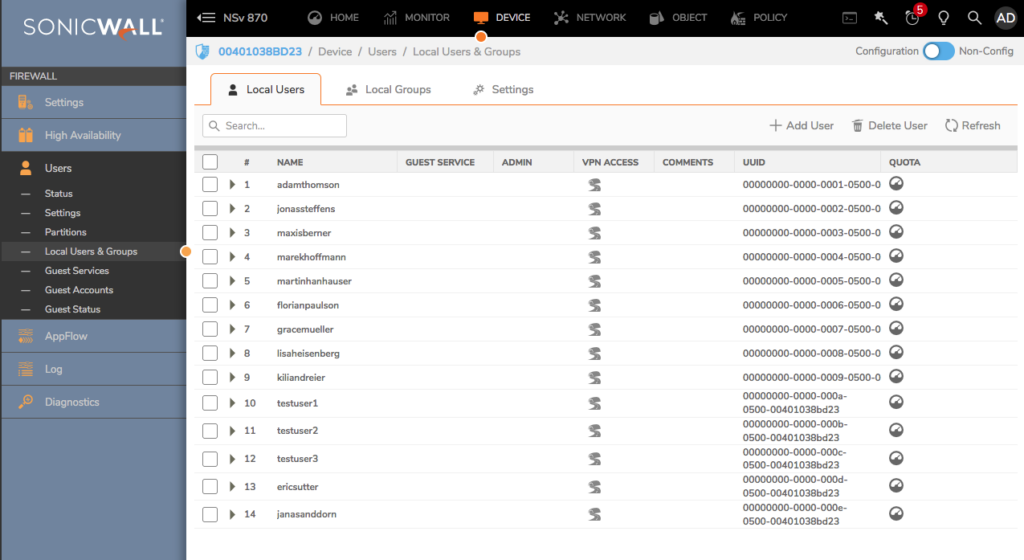
Add new VPN users to your SonicWall device
- Fill out the User Settings, including username (i.e. dianestephens) and password. If preferred, you can activate the slider User must change password and set a standard password and allow the user to set their own later
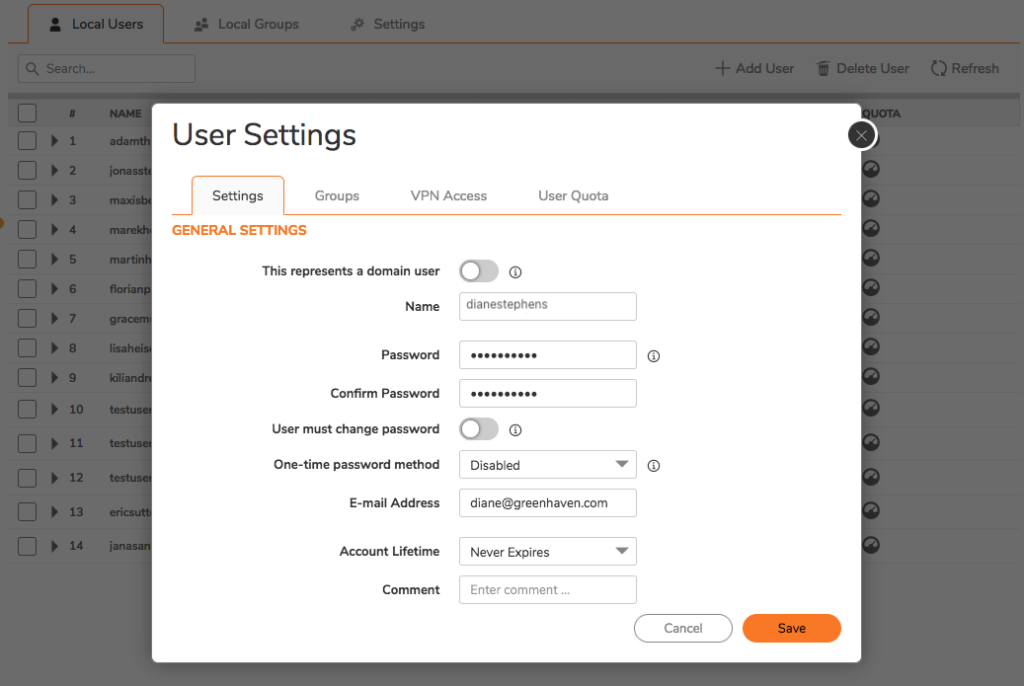
Fill out the settings for your new VPN user
- Under the Groups tab, select any User Groups the new user should join. New users will automatically be assigned to the group Trusted Users, which is later used for the VPN configuration in this guide
- If you wish to set up a dedicated group for this connection, you can do this under the Local Groups tab
- Important for SSL VPN connections: If you are planning on configuring SSL VPN, please ensure you've added users to the group SSLVPN Services
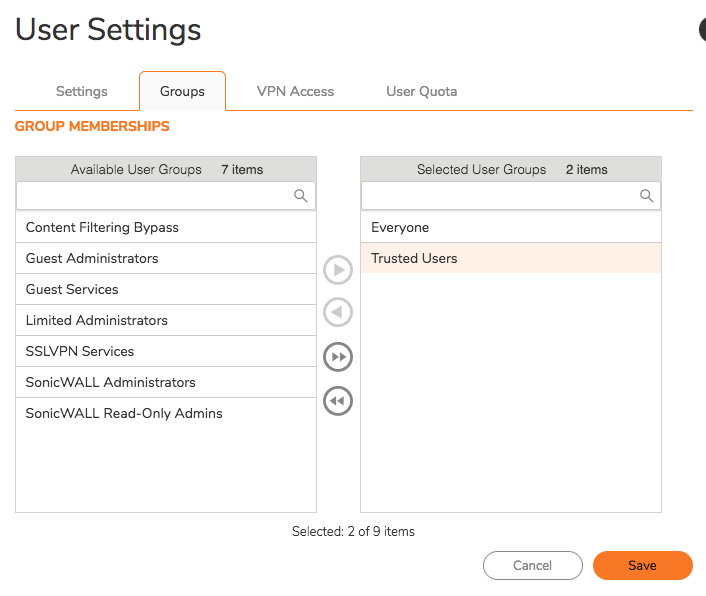
Select User Groups for the new user to join. SSLVPN Services is required in order to connect to SSL VPN
- Under VPN Access, select which networks your user is permitted to access
- Click Save to finish configuring the new user
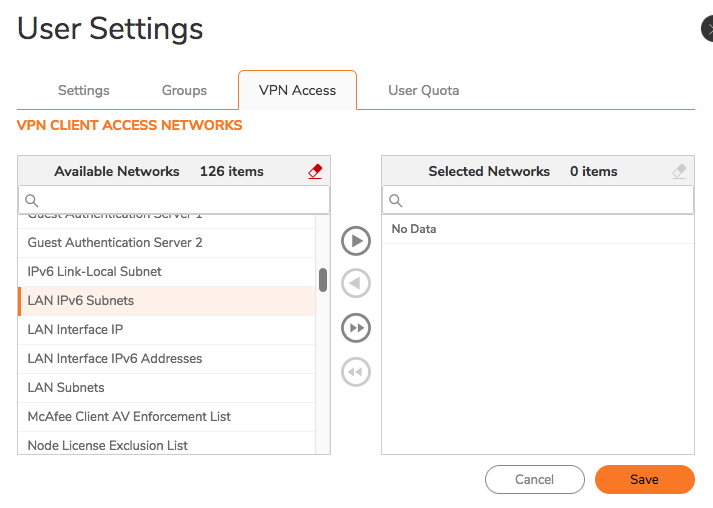
Select user VPN access privileges
- You can now configure your VPN tunnel:
Configure IPsec VPN on your SonicWall firewall
Configuration checklist
Throughout this guide there will be certain pieces of information which are needed later on for configuring IPsec VPN in the VPN client. This information is marked within the guide so it is easier for you to reference:
- Device Host Name or Public (WAN) IP Address - you will find this under Network > System > Interfaces > IP Address
- Shared Secret (Pre-shared Key)
- SonicWall User Login
- SonicWall Password
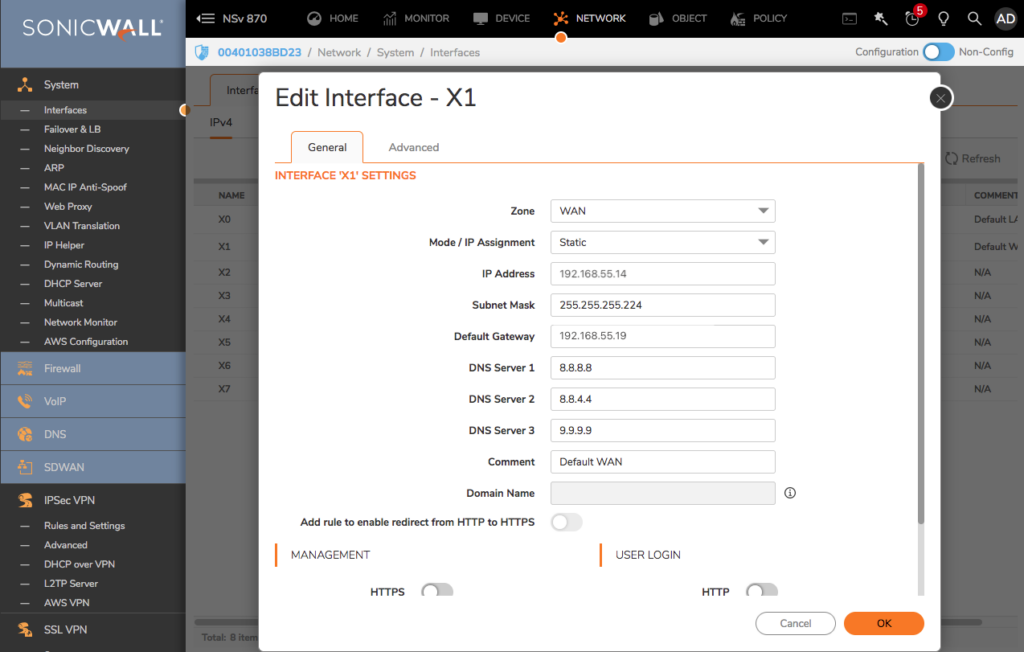
Find your device's IP address
Step One: Add a new IPsec VPN profile
- Navigate to the Network tab, then to IPSec VPN > Rules and Settings in the sidebar menu
- Under VPN Global Settings, click the slider to Enable VPN and WAN GroupVPN
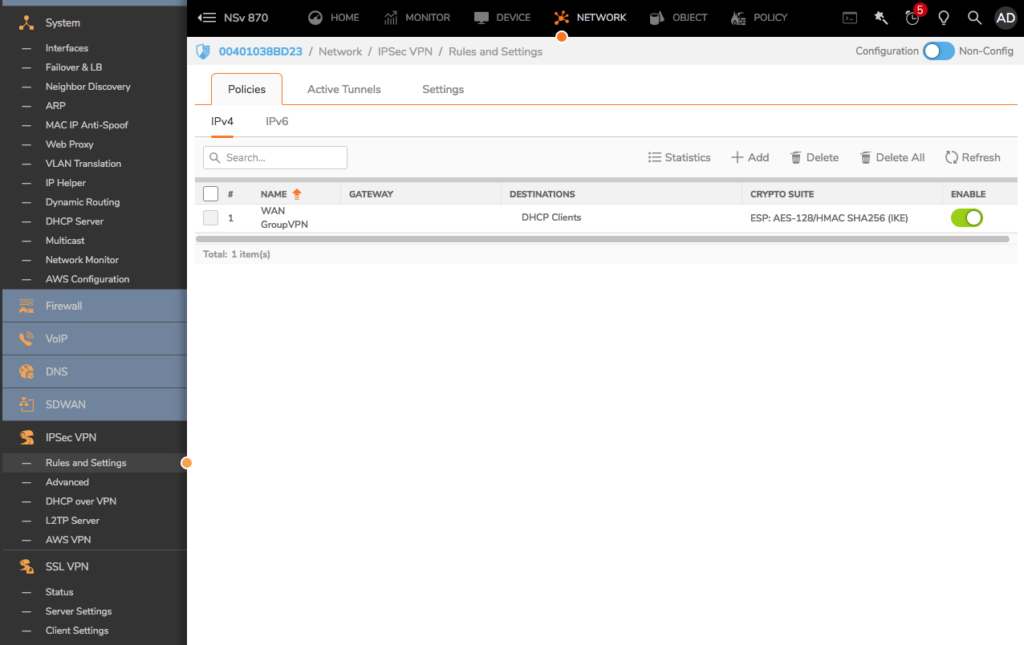
Enable VPN and WAN GroupVPN
Click to edit the WAN GroupVPN connection - you will now see a configuration window. Here you can fill out the general settings of your IPsec VPN tunnel:
- For Authentication Method, select IKE using Preshared Secret
- Now, enter a secure Shared Secret (2) in the space provided. Store this somewhere safe, as you will need it to configure your VPN connection in the VPN client
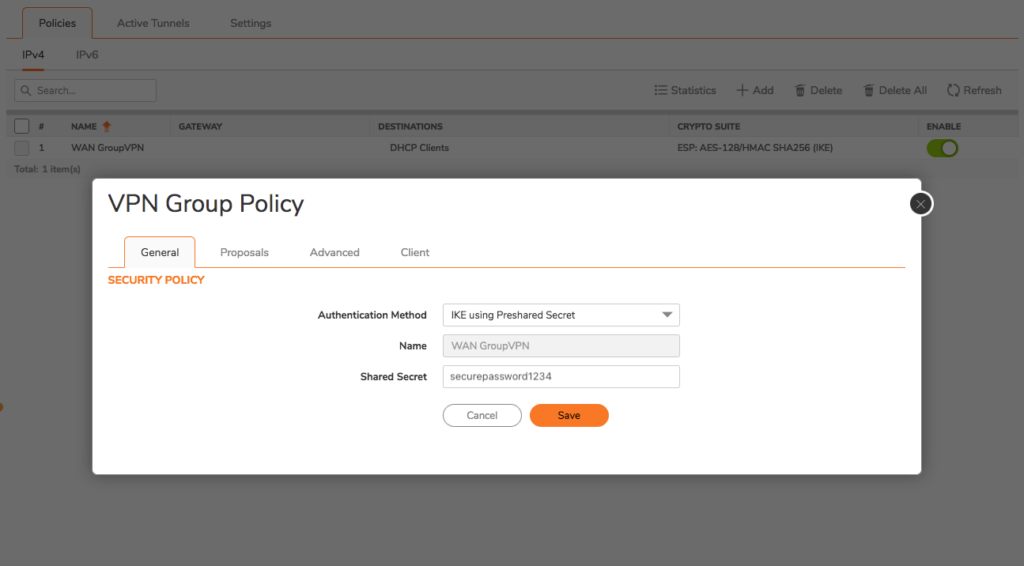
Select your authentication method and enter a secure Shared Secret for the VPN
Switch to the Proposals tab. Here you can enter the encryption settings for your VPN:
Phase 1:
- DH Group: Select Group 14 (the higher the group number, the better the encryption)
- Encryption: Choose AES-128 for best results
- Authentication: SHA256
- Life Time: 28800 seconds
Phase 2:
- Protocol: ESP
- Encryption: Also AES-128
- Authentication: SHA256
- Enable Perfect Forward Secrecy: On
- DH Group: Group 14
- Life Time: 28800 seconds
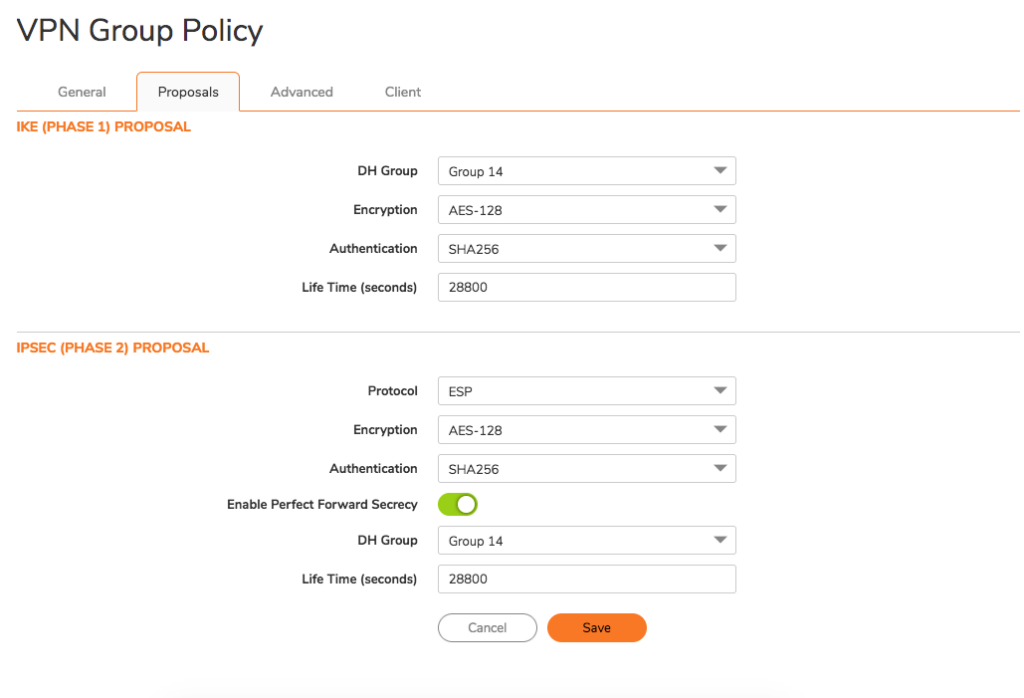
Enter your IPsec connection settings for the new policy
- Under the Advanced tab, go to Client Authentication and enable the slider next to Require authentication of VPN clients by XAUTH
- Then, choose a User Group from the dropdown (e.g. Trusted Users)
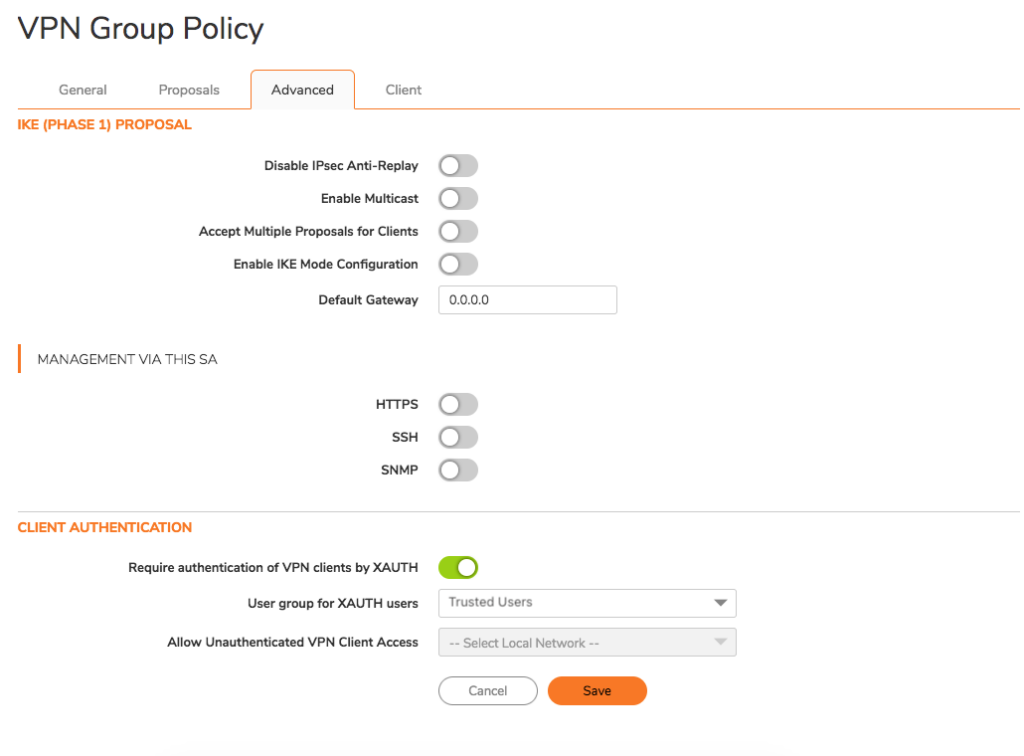
Select a User Group to have access to the VPN
- If desired, you can also configure optional settings for the VPN client under the Client tab - for example, if you enable Use Default Key for Simple Client Provisioning, the connection user will not have to enter a PSK when connecting (less secure)
- When you're done, click Save to complete the configuration
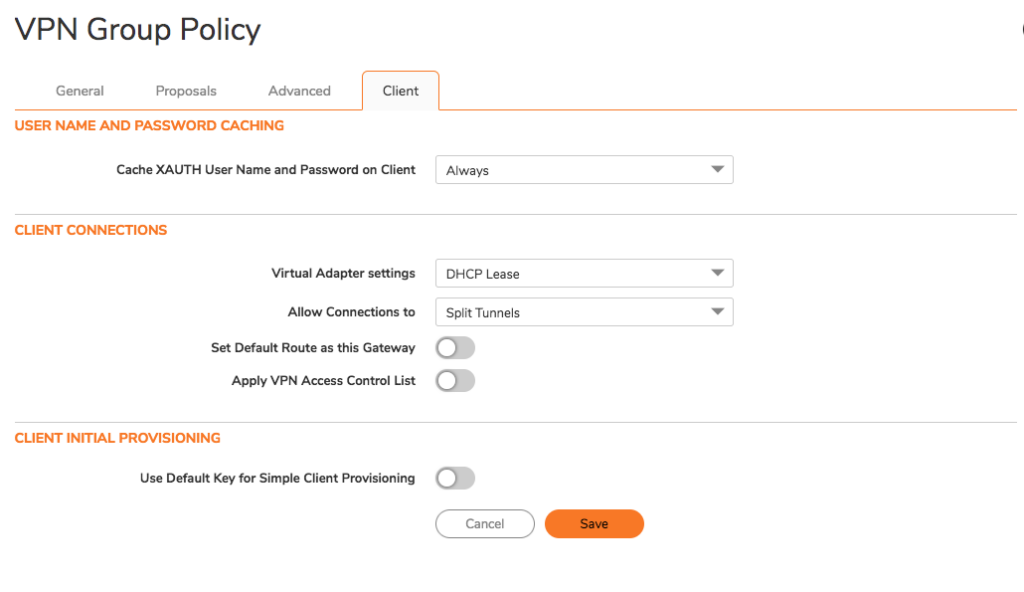
Optional: Configure additional settings for the VPN client
Connect to your new SonicWall IPsec VPN tunnel
In order to connect to the new IPsec VPN tunnel and get secure remote access to your SonicWall firewall, you will need a VPN client.
VPN Tracker supports IPsec VPN connections on Mac, iPhone and iPad and you can get set up in seconds, thanks to support for Simple Client Provisioning (SCP)!
Enter your SonicWall's IP address into VPN Tracker and your connection settings will be automatically detected.
Follow these steps to configure a connection:
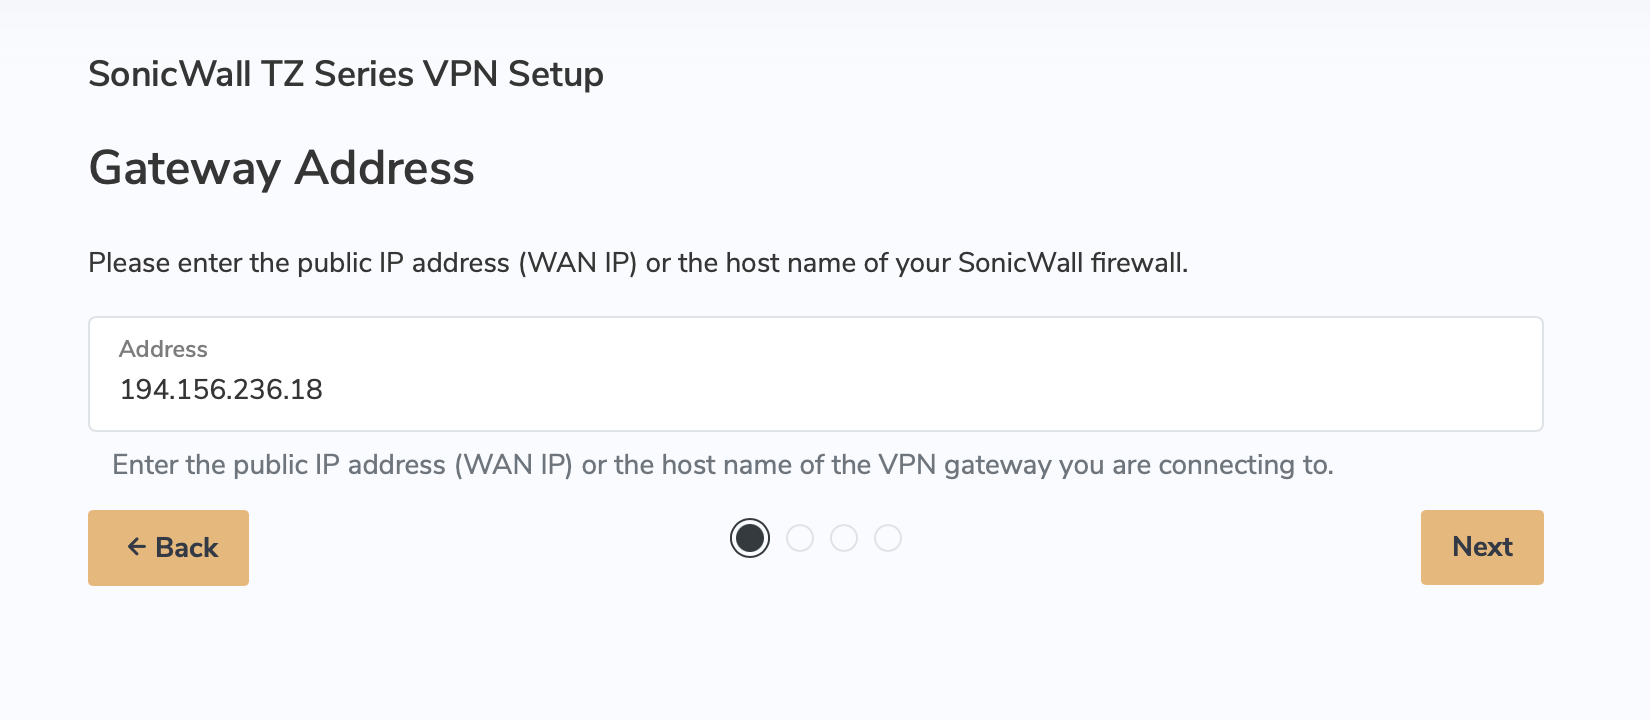
- Open the VPN Tracker configuration assistant for SonicWall, choose your firewall (e.g. Tz Series) and create a new IPsec connection
- Enter the Host Name or IP Address (1) of your SonicWall firewall
- Authentication: Choose Pre-shared key and enter the Shared Secret (2) you configured on your firewall
- User login details (XAUTH): Here you can enter your unique Username (5) and Password (6) from the SonicWall firewall
- Once you've completed the steps in the wizard, securely save your connection to your VPN Tracker account
You can now connect to your SonicWall Next-Generation Firewall via IPsec VPN on Mac, iPhone or iPad.
Configure SSL VPN on your SonicWall firewall
Configuration checklist
Throughout this guide there will be certain pieces of information which are needed later on for configuring SSL VPN in the VPN client. This information is marked within the guide so it is easier for you to reference:
- Device Host Name or Public (WAN) IP Address - you will find this under Network > System > Interfaces > IP Address
- Port number
- Domain
- SonicWall User Login
- SonicWall Password
Find your device's IP address here
Step One: Activate SSL VPN
- In your SonicWall's web UI go to the Network tab, then go to SSL VPN > Server Settings in the sidebar menu
- Here, make sure SSL is activated for the WAN zone using the sliders - you can also activate it for other zones if desired
- Under SSL VPN server settings, make a note of the SSL VPN port (2) and the User Domain (3) - you will need these to configure the VPN client in the next step
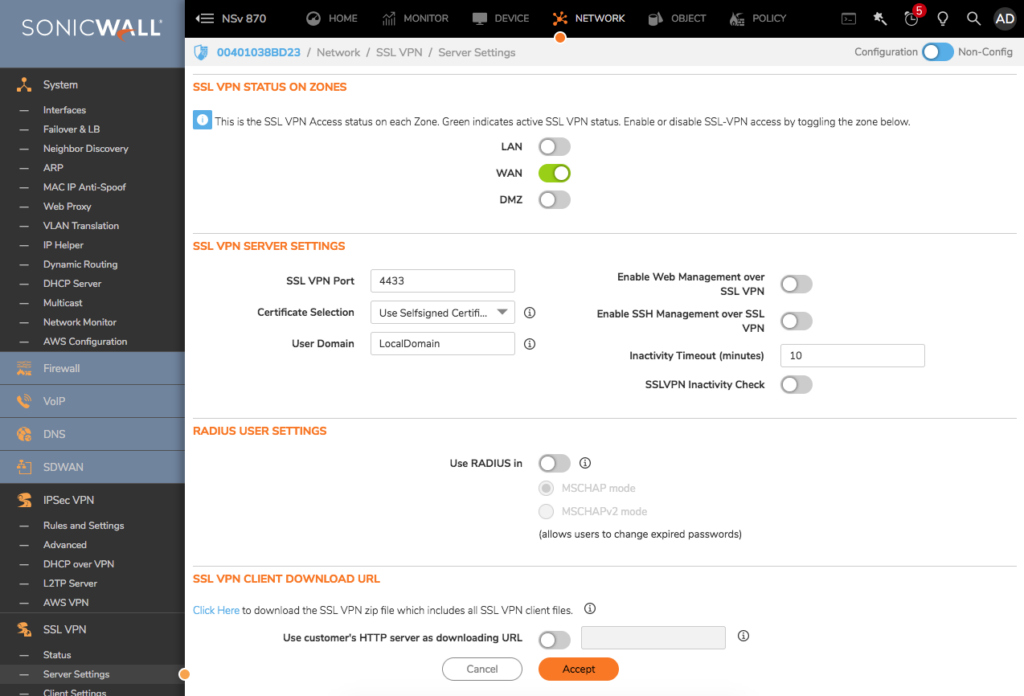
Activate SSL VPN for WAN zone
Connect to your new SonicWall SSL VPN tunnel
In order to connect to the new SSL VPN tunnel and get secure remote access to your SonicWall firewall, you will need a VPN client.
VPN Tracker supports SonicWall SSL VPN connections on Mac, iPhone and iPad!
Follow these steps to configure a connection:
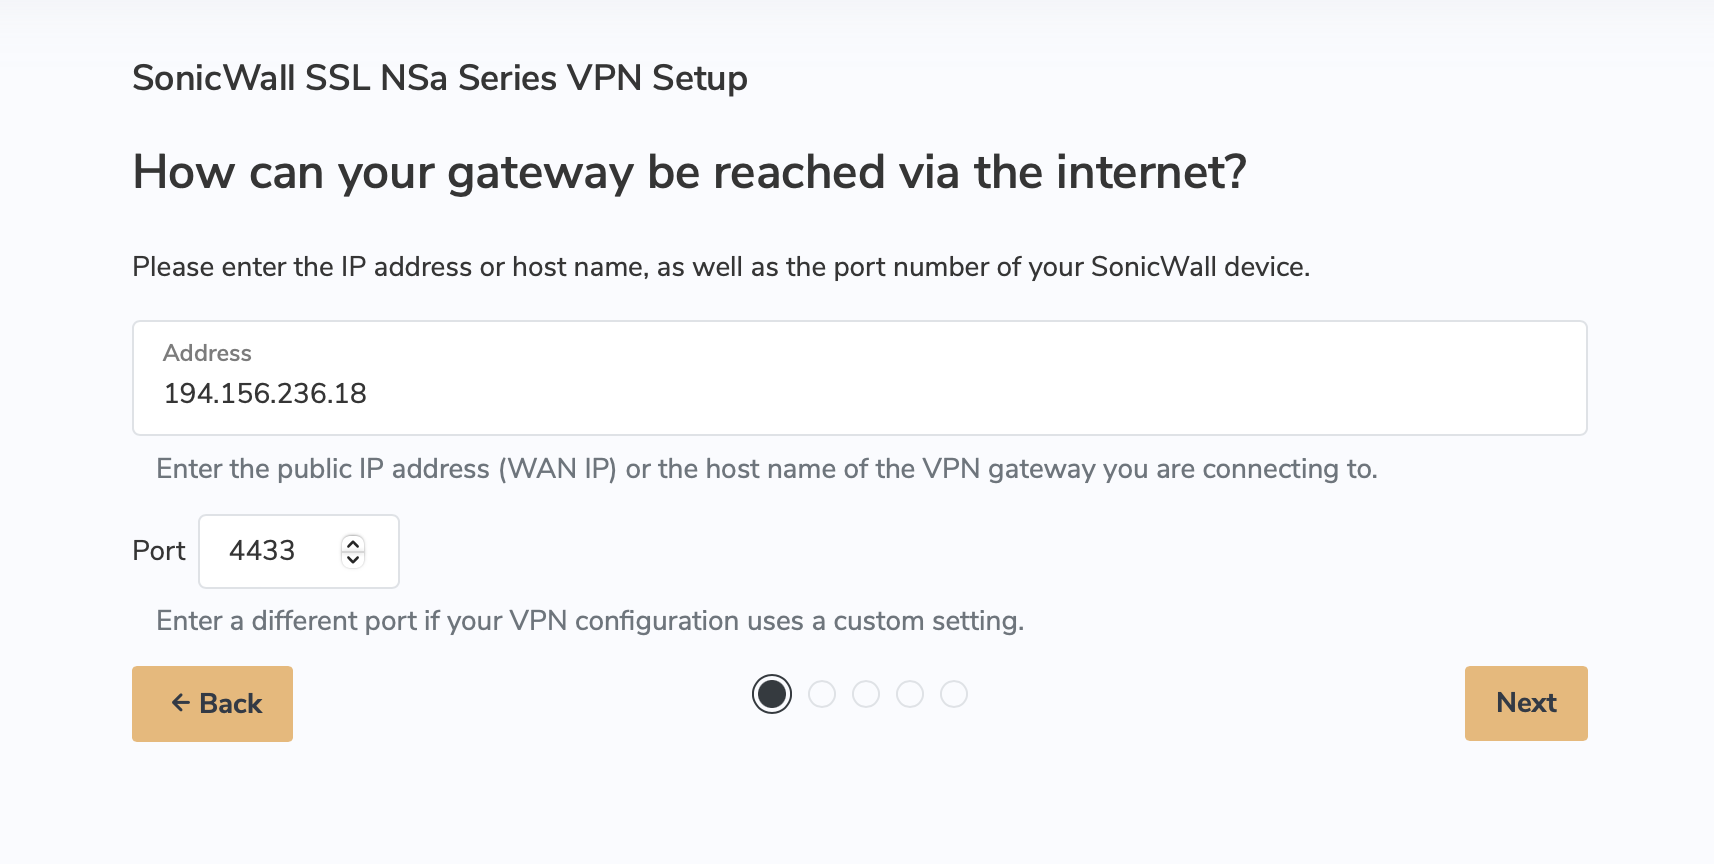
- Open the VPN Tracker configuration assistant for SonicWall, choose your SonicWall firewall (e.g. NSa Series) and create a new SSL connection
- Enter the IP address or host name of your SonicWall device (1)
- For Port, you will need the port number (2) of your SonicWall (found in SSL settings.) Please note: This needs to exactly match your device in order for the connection to work
- By Domain, enter the VPN domain (3) configured on your SonicWall device - you will also find this under the section SSL settings
- For User, enter the unique Username (4) and Password (5) you created on the SonicWall gateway in the beginning of the configuration process
- Once you've completed the VPN configuration wizard, securely save your new connection in your VPN Tracker account
You can now connect to your SonicWall Next-Generation firewall via SSL VPN on Mac, iPhone or iPad.
Share a SonicWall VPN connection with your team
Configuring VPN for multiple users? VPN Tracker makes it easier than ever to roll out pre-configured VPN connections to team members using secure, end-to-end encrypted, cloud-based technology.
Select Share with Team to instantly share the new connection with team members using TeamCloud and grant them secure VPN access on Mac, iPhone and iPad. Learn more.
Tip: You can even choose to hide the connection settings upon export for complete zero-trust privacy.
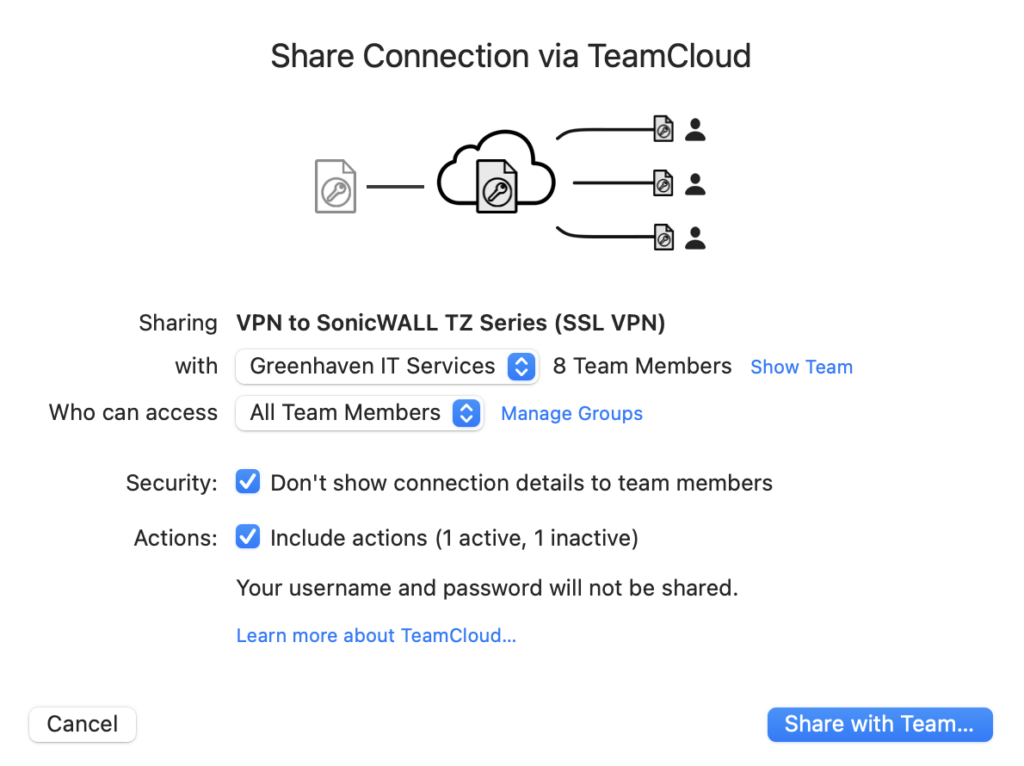
Use TeamCloud technology to securely share VPN connections with team members
Once a team member has received their connection, all they need to do is use their unique Username and Password from the SonicWall gateway to access the VPN in VPN Tracker.
Your VPN Tracker benefits
- Secure remote access to your company network, home office, and Smart Home - all in one app
- Use your own VPN gateway
-
Ready-made profiles for 300+ VPN devices
- Configuration wizard for a smooth and fast setup
- For Mac, iPhone, iPad
- Discover all features