This guide shows you how to configure SoftEther VPN with L2TP/IPsec and OpenVPN, and how to connect from your Mac, iPhone or iPad using VPN Tracker. If you’ve just finished setting up a SoftEther server, this walkthrough helps you bring your configuration into VPN Tracker so you can get connected quickly.
Quick Navigation
- What is SoftEther?
- Compatibility
- Who is this guide for?
- L2TP/IPsec Setup
- Connect to L2TP in VPN Tracker
- OpenVPN Setup
- Import .ovpn into VPN Tracker
- L2TP vs OpenVPN for SoftEther?
- Conclusion
Introduction — what is SoftEther VPN?
SoftEther VPN is an open-source, multi-protocol VPN server that runs on Windows, Linux and macOS. SoftEther acts as a VPN gateway, allowing remote users to securely connect to your network over standard VPN protocols; supporting a range of protocols including its own SoftEther protocol, L2TP/IPsec, OpenVPN, and SSTP. This flexibility makes it a popular choice for home labs and businesses looking for a versatile VPN solution.
On macOS, the most straightforward ways to connect to a SoftEther VPN server are via L2TP/IPsec or OpenVPN. Both are supported by VPN Tracker, making it simple to connect your Mac to your SoftEther network.
Compatibility & Requirements
- Server: SoftEther VPN Server running on Windows, Linux or macOS
- L2TP/IPsec: Supported by VPN Tracker for Mac
- OpenVPN: Supported by VPN Tracker for Mac and iOS via standard .ovpn configuration files
- Ports: L2TP/IPsec requires UDP 500 and 4500. OpenVPN defaults to UDP 1194
Who is this guide for?
Many users set up a SoftEther VPN server because they need secure remote access, but the next step — getting connected from a Mac — isn’t always straightforward. This guide is designed for:
- Small business owners who have a SoftEther VPN running on a Windows server and want their Mac laptops to connect securely.
- IT consultants deploying SoftEther for clients and looking for a reliable Mac VPN client with monitoring features.
- Home lab users experimenting with SoftEther on Linux or Windows and needing quick access to their lab network from macOS.
If any of these scenarios sound familiar, you’ll find step-by-step instructions below for setting up L2TP/IPsec or OpenVPN on your SoftEther server and connecting with VPN Tracker on your Mac.
Setting up L2TP/IPsec on SoftEther
Note: The following steps and screenshots show the setup process using the SoftEther Server Manager for Windows. If you are running SoftEther on Linux or macOS, you can configure the same settings using the command-line tool (vpncmd). The overall steps are the same, but the interface will look different.
Quick Guide: Enable L2TP/IPsec on your SoftEther VPN Server (detailed steps and screenshots below):
- Open SoftEther Server Manager and select your Virtual Hub
- Create user accounts and a group for the VPN connection
- Ensure a DHCP server or IP pool is available for VPN clients
- Enable L2TP/IPsec Server Function and set a pre-shared key (PSK)
Detailed setup guide for SoftEther L2TP VPN
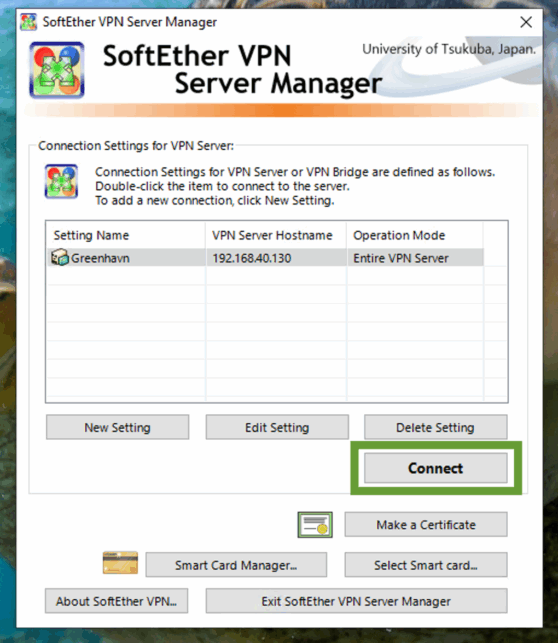
Launch the SoftEther Server Manager, identify your server in the list and click on Connect:
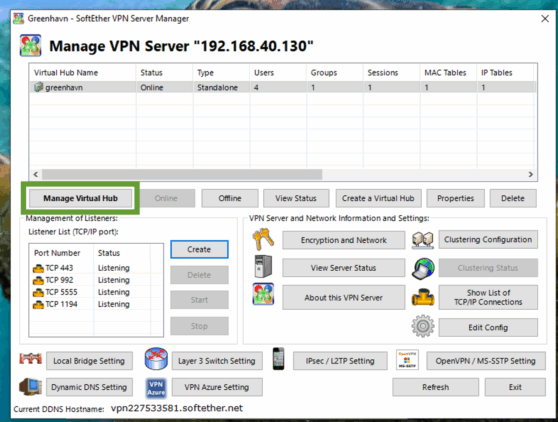
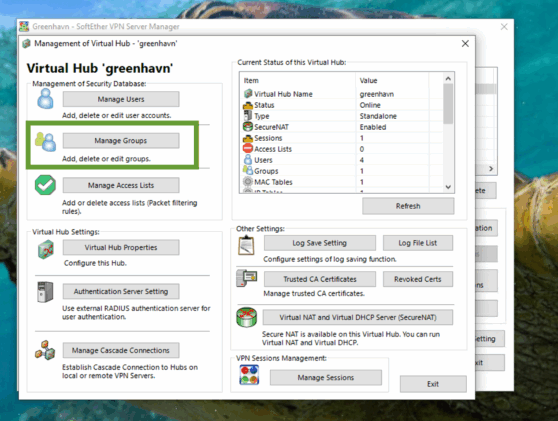
You will now see the control center for your server. Click on Manage Virtual Hub to open the VPN configuration area:
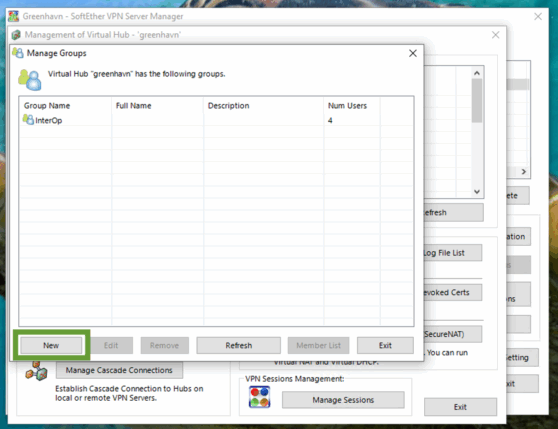
First, set up a User Group for the VPN. This makes it easier to manage multiple users later. Go to Manage User Groups > New:
Next, add VPN users and assign them to the group you just created under Manage Users:
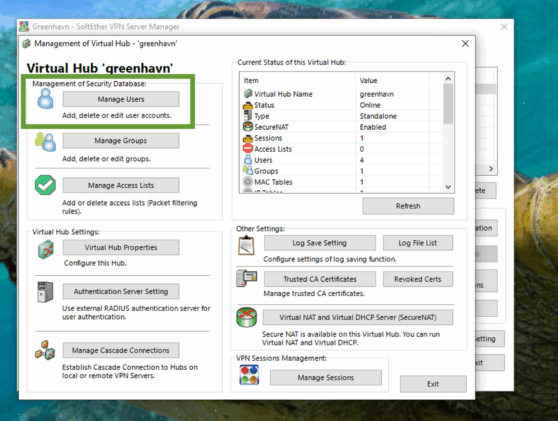
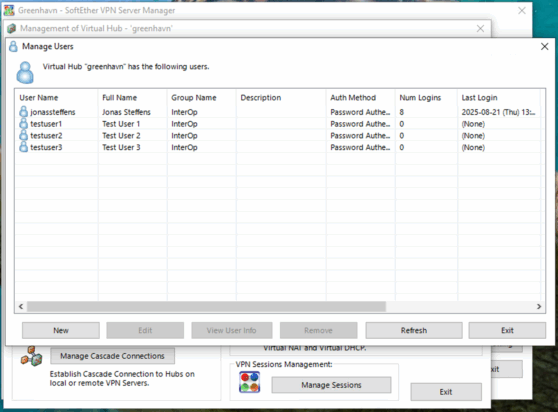
Important: These usernames and passwords will be required later when connecting in VPN Tracker.
Now, return to the Virtual Hub and open the Virtual NAT and Virtual DHCP Server settings:
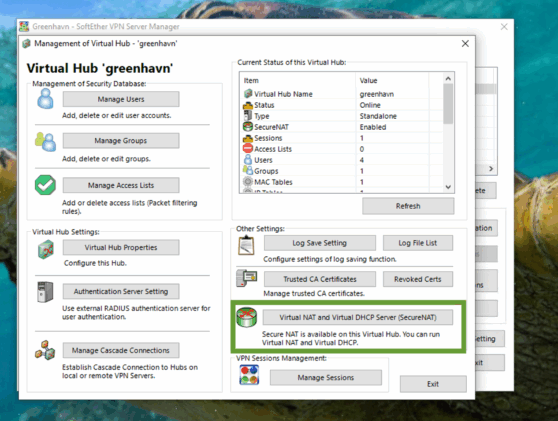
Enable SecureNAT for your SoftEther server. SecureNAT combines Virtual NAT and DHCP:
- Virtual NAT (Network Address Translation) allows VPN clients to access the network behind your VPN server without needing changes to your existing router or firewall.
- Virtual DHCP automatically assigns IP addresses to VPN clients so they can communicate properly once connected.
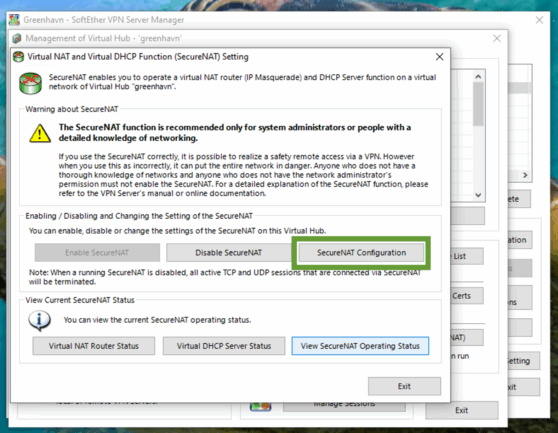
Click Configure SecureNAT to review and adjust the settings for your network:

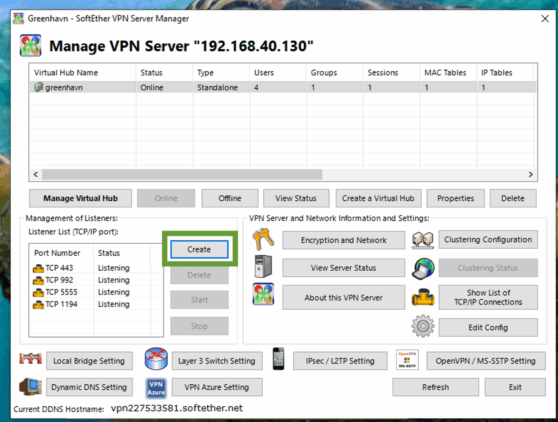
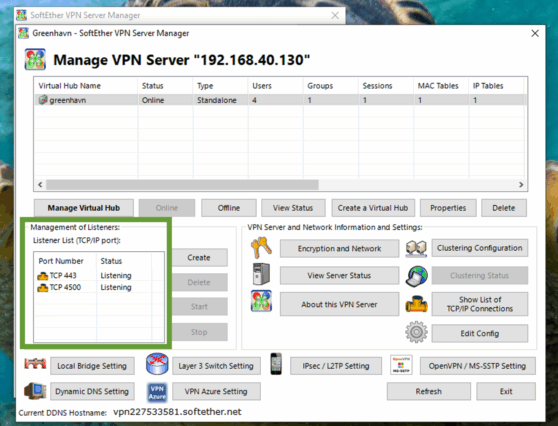
Next, create a Listener. Listeners tell SoftEther which network ports it should use to accept incoming VPN connections.
Add port 4500, which is required for L2TP/IPsec VPN, and click OK:
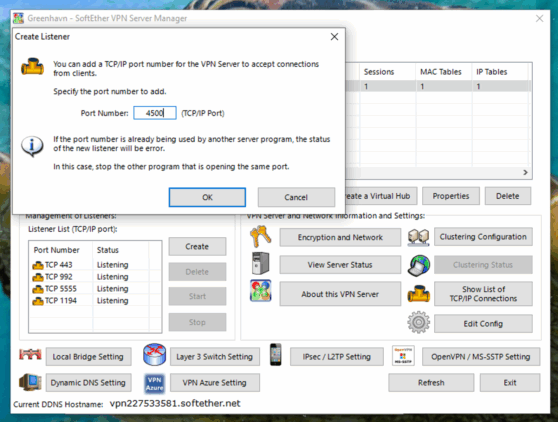
You can now remove other Listeners (OpenVPN, JSON API, TelnetSSL) as they are not needed for this L2TP setup. Leave only ports 4500 and 443 active:
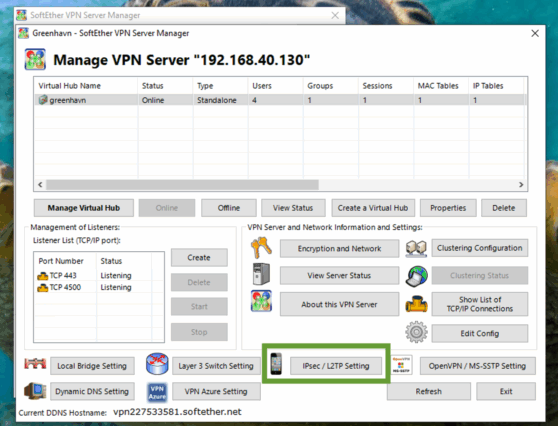
Finally, open IPsec/L2TP Setting:
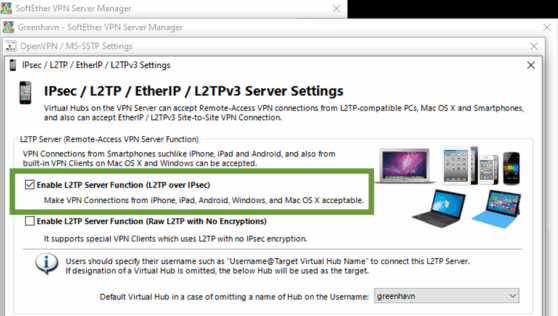
Check the option to Enable L2TP Server Function:
Then, enter a secure IPsec Pre-Shared Key (PSK):
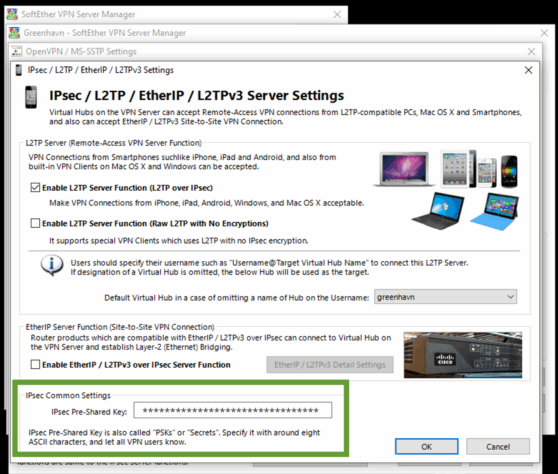
Tip: The PSK is essential — you will need it in the next step when setting up the connection in VPN Tracker. Make a note of it somewhere safe.
Connecting to SoftEther L2TP on your Mac in VPN Tracker
Once L2TP/IPsec is active on the SoftEther server, set up your connection in VPN Tracker:
- On any device, open the VPN Tracker Connection Creator for L2TP VPN
- Enter the Server Address (the public IP or DNS host name of your SoftEther server)
- Fill in the Username and Password you created in SoftEther
- Enter the Pre-shared Key (PSK)
- Save the connection securely to your VPN Tracker account, ready to use on your Mac
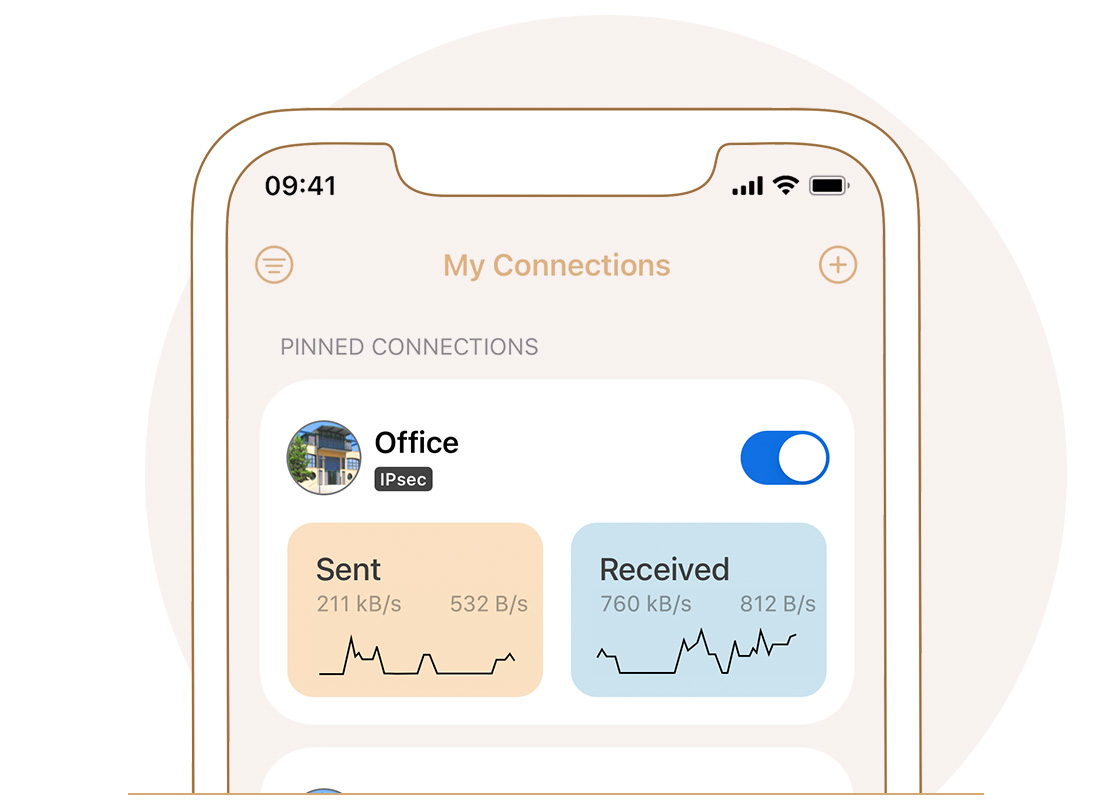
![]()
Click on Connect in VPN Tracker for Mac to establish a secure tunnel to your SoftEther server. You can monitor connection status and traffic directly within the app.
Setting up OpenVPN on SoftEther
If you prefer to use OpenVPN:
- In SoftEther Server Manager, select your Virtual Hub.
- Enable the OpenVPN Server Function and choose a port (default: 1194).
- Generate and export the .ovpn configuration file.
- Provide this file securely to your users.
The exported file contains all necessary connection settings, including certificates if required.
Importing an OpenVPN Connection into VPN Tracker
- Open the VPN Tracker Connection Creator for OpenVPN on any device
- Select your .ovpn file.
- Review the imported settings (server, port, authentication).
- Save the connection securely to your VPN Tracker account, ready to access on your Mac, iPhone and iPad
L2TP vs OpenVPN on SoftEther
SoftEther supports multiple VPN protocols, and the two most common choices are L2TP/IPsec and OpenVPN. Which one you choose depends on your setup and requirements:
- L2TP/IPsec: Easy to set up and natively supported on many operating systems. A good choice if you need broad compatibility across devices without installing extra software. However, it can be harder to troubleshoot if ports are blocked by firewalls or ISPs.
- OpenVPN: Offers strong security and reliability, and often works better behind restrictive networks because it uses a single configurable port. It requires installing the OpenVPN component on your SoftEther server, but once set up, it’s highly stable.
Whichever option you go for, VPN Tracker supports both L2TP/IPsec and OpenVPN connections, so you can easily connect to your SoftEther VPN from your Mac.
Get started with VPN Tracker today
Whether you choose L2TP/IPsec or OpenVPN, VPN Tracker provides a straightforward way to connect from your Mac, iPhone or iPad. With VPN Tracker you can save multiple connections, monitor VPN availability, and connect to your network with just one click.
Why VPN Tracker?
VPN Tracker is the best secure remote access solution for Mac, iPhone and iPad and is compatible with the most popular VPN gateways, including SoftEther, UniFi, NETGEAR, TP Link, Draytek, and many more.
Your VPN Tracker benefits
- Securely connect with your home and office networks
- Use your own gateway
- Preconfigured profiles for 300+ VPN devices
- Expert productivity features for teams
- For Mac, iPhone, iPad