All posts in this series
- Understanding Cryptographic Terms - Cryptography 101
- All About Certificates - The Anatomy of a Certificate
- Which Types of Certificates Exist and How are They Created?
- What is the Subject Alternative Name and Why is it Important for VPN?
- Why Are Certificates Used for VPN? Best Practice Authentication
In our previous posts, we've clarified some basic terms and had a look at basic cryptographic operations. We also took a more detailed look at which information is stored inside of certificates and how certificates are stored to files.
In this post, we are taking a closer look at which kinds of certificates exist in the chain of trust and how they are actually created, including step-by-step instructions for how to create a certificate request on your Mac.
What are the different certificate types in the chain of trust?
There are three major types of certificates which make up the so-called "certificate chain of trust":
- Root Certificates (aka CA Certificates)
- Intermediate Certificates
- Leaf Certificates (aka End-entity Certificates)
Certificates and trees – what do they have in common?
Certificates are often said to form a chain of trust, but in reality there are usually multiple chains starting from the same roots and crossing the same paths on their way to the last certificates in the chain. This is why a tree analogy is often used to describe certificates, with certificates at the root, certificates that act like branches, and certificates that sit like leaves at the very end of the tree.

The chain of trust can be compared to a tree with roots, branches and leaves
What are root certificates and why are they needed?
Root certificates are certificates that are signed by themselves – meaning they don't have another certificate ordered above them.
These certificates are typically owned by organizations that issue certificates to other organizations or individuals. As these organizations are also called Certificate Authorities (CA), root certificates are often referred to as CA certificates.
Root certificates really only exist to sign other certificates. This is done to announce that the information within the other certificate has been verified to be correct by the owner of the root certificate and to ensure that the certificate data cannot be changed anymore, as any change would cause the signature to break.
What are intermediate certificates and why are they needed?
Intermediate certificates are certificates that are signed by root certificates or other intermediate certificates. Their task is the same as that of root certificates. The reason they exist is that every time you want to sign something with the root certificate, you must access its private key. The more often you access that key, the more prone it will become to attacks.
Furthermore, you cannot scale up root certificate signing, unless you store the private key in multiple locations, which again increases the attack vector. Replacing a root certificate is also quite expensive, as it must be replaced everywhere it was in use so far. For this reason, you ideally want root certificates to have a long lifetime and you don't want to revoke them. In contrast, intermediate certificates can have a shorter lifetime; meaning they can be renewed more often and revoked without great effort (i.e. in the case of a security breach.)
Last but not least, not every organization can become a CA of its own under all circumstances but they can have a CA issue them an intermediate certificate, allowing them to sign other certificates themselves.
Intermediate certificates are best represented as the branches in our tree example.
What are leaf certificates and why are they needed?
Leaf certificates are at the very end of the chain. They are signed by either a root or an intermediate certificate and their task is to identify either an organization, a person, a service, or a single computer. Together with their private key, they can also be used to encrypt or sign data or decrypt and verify data.
The basic structure of all certificate types is always the same, only the additional fields they contain will vary. For example, there is a field that defines that a certificate may sign other certificates. This field is only found in root and intermediate certificates.
On the other hand, a leaf certificate requires fields that make it clear what exactly this certificate is identifying and which actions may be performed with this certificate (e.g. it may only allow signing data but not encrypting data).
How to Obtain a Root Certificate
Since a root certificate is self-signed, anyone can create one for themselves. Of course, unlike the root certificates from well known certificate authorities (CAs) that are pre-installed in operating systems and browsers, a self-created root certificate is not known by anyone and therefore not trusted by anyone without first installing and manually trusting it.
Since pretty much every operating system and browser allows you to do so, it isn't uncommon for companies to create their own root certificates and pre-install them on company devices, so that these devices will automatically trust intermediate and leaf certificates signed by them. This way companies can create their own chain of trust and don't need to depend on trusting a specific CA.
Moreover, CAs will not sign certificates for free and having to manage a large number of internal certificates can quickly become very expensive. For public certificates, however, it's important to have a certificate signed by a well known CA, as it cannot be assumed that users accessing public services will trust your company CA by default. The installation process can be off-putting and if a website opens with an "untrusted certificate warning", this does not create a positive first impression.
How to Obtain an Intermediate Certificate
The only thing special about an intermediate certificate is that it can sign other certificates. Other than that, it behaves like a leaf certificate, except that you cannot obtain one from a CA.
The reason a CA won't provide you with one is that by signing your intermediate certificate, they would by default be trusting any certificate signed by the intermediate certificate. Of course, this would be less than ideal for their business, as users could go to the owner of the intermediate certificate instead of the CA to get their leaf certificate(s) signed. Also they have no way to ensure that the owner of the intermediate certificate carries out proper trust checks and will not destroy the chain of trust.
How to Obtain a Leaf Certificate
To obtain a leaf certificate, you could in theory create your own leaf certificate, send it to the owner of a root or intermediate certificate, have them sign it and send the signed certificate back to you. However, this approach has several caveats:
Every certificate must have an issuer and that's the organization who signed it:
Who would be that issuer when you create the certificate yourself prior to having it signed? Also the issuer must ensure the certificate has a unique serial number. So to correctly create the certificate, the future signer would have to tell you what info to write into the issuer fields, which serial number to use and then verify you entered everything correctly. This is quite an error prone procedure and one that is very hard to automate.
Certificate libraries can read certificates, create certificates and sign certificates but they are often not capable of altering certificates:
Since certificates are usually never altered, it's not easily possible to have someone create a certificate with any issuer data and serial number and then just replace that information with the correct values prior to signing. In most cases, one would have to read out all the other fields and then re-create the certificate from scratch with some fields altered. But then why create a certificate in the first place? Why not have the issuer create it, as that's what the term "issuer" implies anyway.
Two different versions of the same certificate would exist, one signed and one unsigned:
This would mean one cert could contain correct issuer data, whereas the other contains incorrect issuer data or serial number, which is a bad and possibly confusing situation to begin with. In the end, the wrong certificate may be used or sent out to users.
Also if both use the same issuer information and serial number, you have violated one of the core principles of certificates: The combination of issuer and serial number must be world wide unique. No two certificates that are not exactly identical must ever share the same issuer and serial number!
What is a Certificate Signing Request?
In order to avoid the error-prone process of users creating their own leaf certificates, a better procedure has been invented; known as a Certificate Signing Request (CSR).
How it works
To obtain a leaf certificate, your system first creates a key-pair consisting of a private and public key. It then embeds the public key into a CSR, together with additional information for the future certificate, like the name of your organization or the address of the server or email address of the person the final certificate is being created for.
This CSR can now be sent to an issuer that uses the information from the CSR to create a signed certificate for you – a process that can even be fully automated if no information must first be checked or verified.
Finally, the issuer sends the signed certificate back to you. Note how the private key has never left your system throughout the whole process and thus truly stays secure and private at all times.
What does a Certificate Signing Request look like?
The ASN.1 structure of a CSR is defined by the PKCS #10 standard and it uses the same kind of PEM encoding that is also frequently used to encode certificates.
A CSR will typically look like this:
-----BEGIN CERTIFICATE REQUEST-----

MIICzDCCAbQCAQAwgYYxCzAJBgNVBAYTAkVOMQ0wCwYDVQQIDARub25lMQ0wCwYD

VQQHDARub25lMRIwEAYDVQQKDAlXaWtpcGVkaWExDTALBgNVBAsMBG5vbmUxGDAW

:

: ( a lot more data left out )

:

3wHFK+S7BRWrJQXcM8veAexXuk9lHQ+FgGfD0eSYGz0kyP26Qa2pLTwumjt+nBPl

rfJxaLHwTQ/1988G0H35ED0f9Md5fzoKi5evU1wG5WRxdEUPyt3QUXxdQ69i0C+7

-----END CERTIFICATE REQUEST-----
This data is typically stored in a file with the extension `.csr` but it may also use the extension `.p10` instead and macOS also uses the extension `.certSigningRequest`.
The response is typically a `.p7r` file, that is a PKCS #7 file containing the newly created certificate together with the CA (and possibly intermediate certificates) of the issuer that are required to verify the signature of the newly created certificate.
The "r" in p7r stands for response (response to the signing request), as there are other kinds of PKCS #7 files, e.g. the `.p7b` certificate container mentioned in the last blog post about certificates.
How to create a Certificate Signing Request (CSR)
On macOS you have two options to create a CSR: You can use the Certificate Assistant, which features a graphical user interface, or you can use the `openssl` command in Terminal.
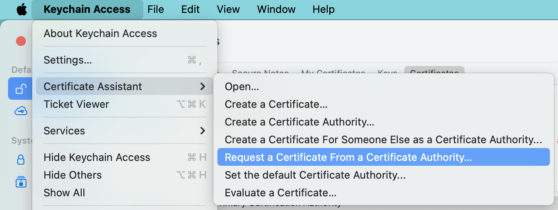
Using the macOS Certificate Assistant
The macOS Certificate Assistant is simple to use, but limited in that it can only create basic requests. In this case, "basic request" means it won't allow you to specify much more than a name and email address in the request. All the other attributes must then be set by the issuer processing the request.
To create a CSR with the Certificate Assistent, open the Keychain Access app on your Mac and carry out the following steps:
Go to Keychain Access > Certificate Assistent > Request a Certificate From a Certificate Authority
Enter your details in the fields provided:
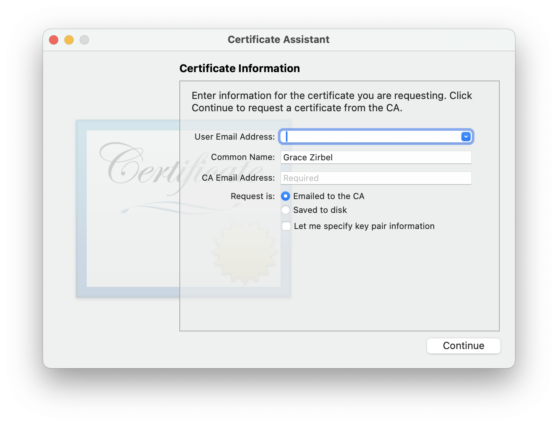 The CSR can either be stored in a file or directly emailed to a CA. The private key created is stored in your Keychain and once you also store the signed certificate there, the system will match the certificate to this private key automatically.
Without the ability to specify any attributes in the certificate request, the requests the assistant creates are only suitable for issuers that will automatically set all attributes for you or would otherwise override requested attributes anyway. For example, when requesting a web server certificate from a commercial CA, such a CSR would be sufficient as the CA will request additional information from you when you upload the CSR and ensure that all other attributes are set correctly for your web server according to the provided information.
However, if you want to have a fully automated system within your organization, you may prefer to directly set additional attributes in the CSR itself and this is only possible when you create the CSR in Terminal.
Creating Certificate Signing Requests in Terminal
This method is more advanced but offers end users more flexibility.
To create a basic request using Terminal, all you had to do is running the following command:
openssl req -new -out certRequest.csr -keyout privateKey.pem
You will first be prompted to provide a password for encrypting the private key and then you will be prompted to provide the following information for your request:
- Country Name: In fact this is only an ISO country code, like `US` or `DE`.
- State or Province Name
- Locality Name: E.g. a city or district
- Organization Name: E.g. The name of a company
- Organizational Unit Name
- Common Name: This is the human readable name of the certificate which later on is displayed in apps and used to identify that certificate
- Email Address: Email address of the certificate owner, can also be a company address
- A challenge password: If set, only an administrator who knows that password can revoke the certificate later on. If not set, whoever has access to the certificate and its private key can later on revoke it
All fields are optional, but you typically want to provide at least Organization Name, Common Name and Email Address.
If you leave all fields blank, no valid CSR can be created. Once the command has finished, two files are created. `privateKey.pem` contains the private key of the future certificate and `certRequest.csr` contains the request for the creation of the certificate.
If you request a personal certificate for a user, Common Name would typically be the name of the user or at least contain the name of the user.
Need a certificate for your VPN server?
Previously, if you requested a certificate for a server, Common Name had to be the address of that server. This is no longer a requirement, because since version 3 of the X.509 standard (X.509v3), certificates that identify the owner of an e-mail address or a specific server must have an attributed named Subject Alternative Name (aka SAN).
How to add a SAN list to your certificate request and create a certificate for a VPN gateway →
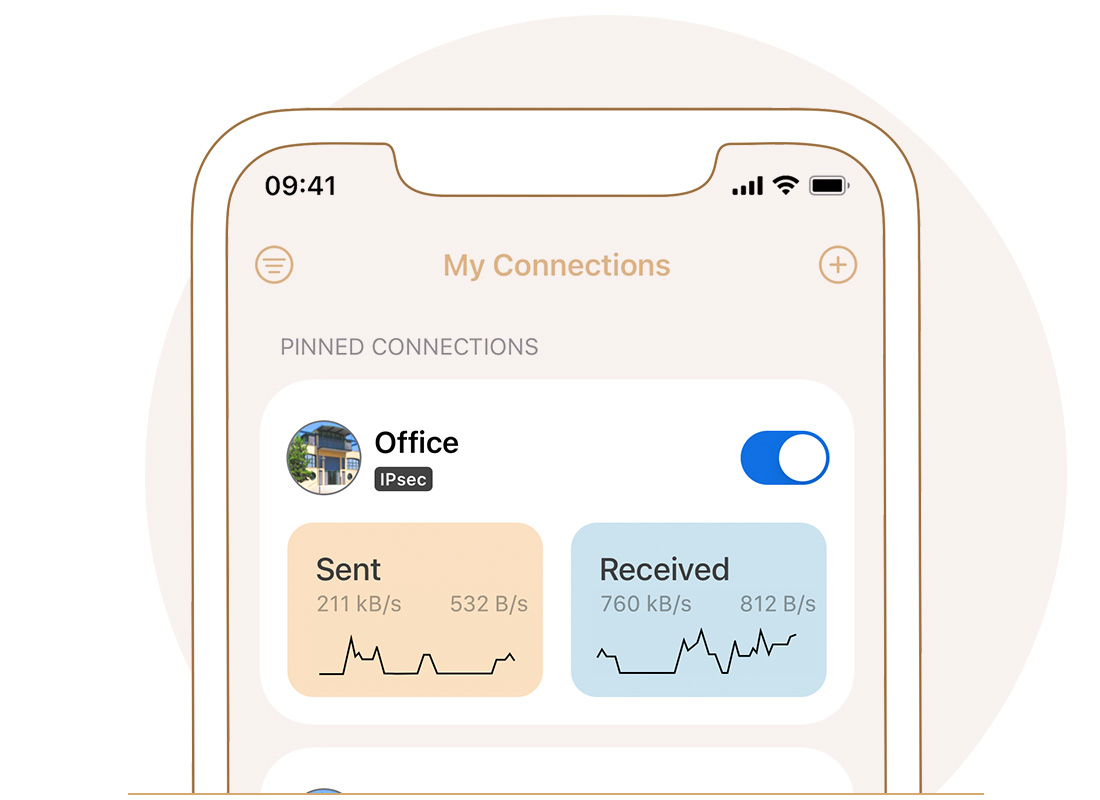
VPN server ready to go? Get secure remote access in VPN Tracker
You've got your certificate and set up your VPN server, now it's time to get connected! VPN Tracker is the best secure remote access solution for Mac, iPhone and iPad and is compatible with the most popular VPN gateways, including UniFi, NETGEAR, TP Link, Draytek, and many more.
Your VPN Tracker benefits
- Securely connect with your home and office networks
- Use your own gateway
-
Preconfigured profiles for 300+ VPN devices
- Expert productivity features for teams
- For Mac, iPhone, iPad
- Explore all features