DrayTek Vigor Firewall VPN Routers are a powerful yet affordable solution for small to midsize businesses looking to secure their office network and provide secure remote access to external workers via VPN.
In this guide, we take you through the key tech specs of the popular DrayTek Vigor 2927 and explain step-by-step how to configure an IPsec (IKEv1 or IKEv2) VPN server on your DrayTek Vigor router to connect remotely to your home or office network on Mac, iPhone, and iPad.
Psst... already set up IPsec VPN on your Vigor router?
Skip the config section and go ahead and get connected to your Vigor router in seconds in VPN Tracker: The secure remote access solution for DrayTek users. Connect to DrayTek Vigor →
IPsec VPN setup for DrayTek Vigor routers
Regardless of your chosen configuration method, the initial IPsec VPN setup consists of the same three steps for IKEv1 and IKEv2 VPN.
To start setting up an IPsec VPN tunnel on your Vigor series router, first open the web interface of your device - this can usually be reached from the trusted network (LAN) of the device - then, carry out the following steps:
Step 1: Retrieve network information
You will need to make a note of certain network information to enter into the VPN client when you connect to your VPN later. You can find this information under System Status.
- First, go to IPv4 LAN Information and note down the LAN 1 IP Address (this is the network you will be connecting to via the VPN tunnel and required for IKEv1 connections)
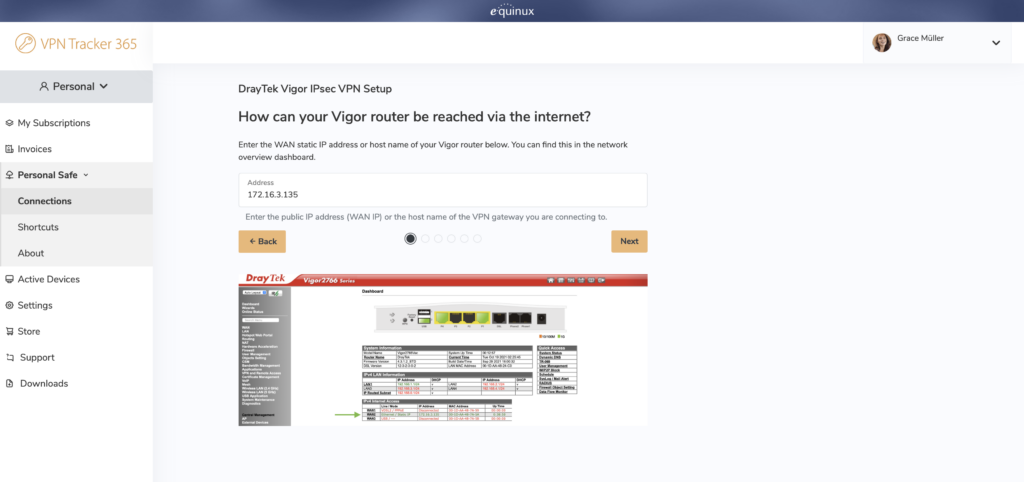
- Then, go to IPv4 Internet Access and note down the Static IP address (this is the public IP address of your Vigor - aka how it is reached via the internet.) If you are using dynamic DNS, use your hostname instead
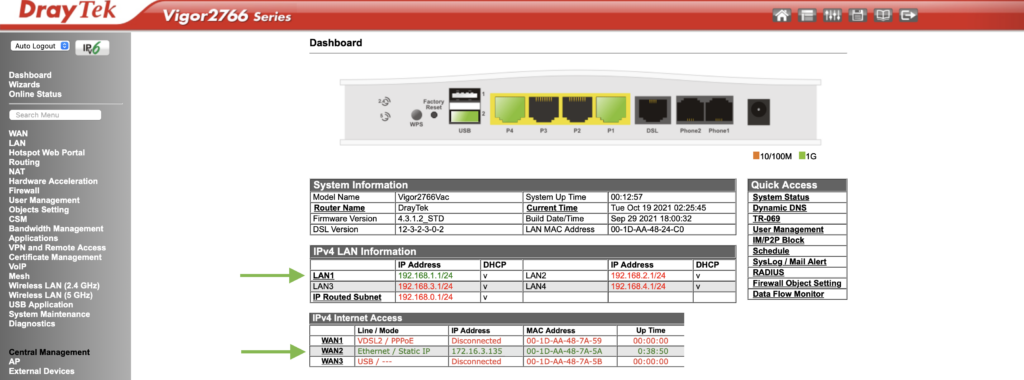
Retrieve your Vigor router's network information from the overview page
Step 2: Enable IPsec VPN
In the menu, go to VPN and Remote Access and click Remote Access Control then check the box Enable IPSec VPN Service:
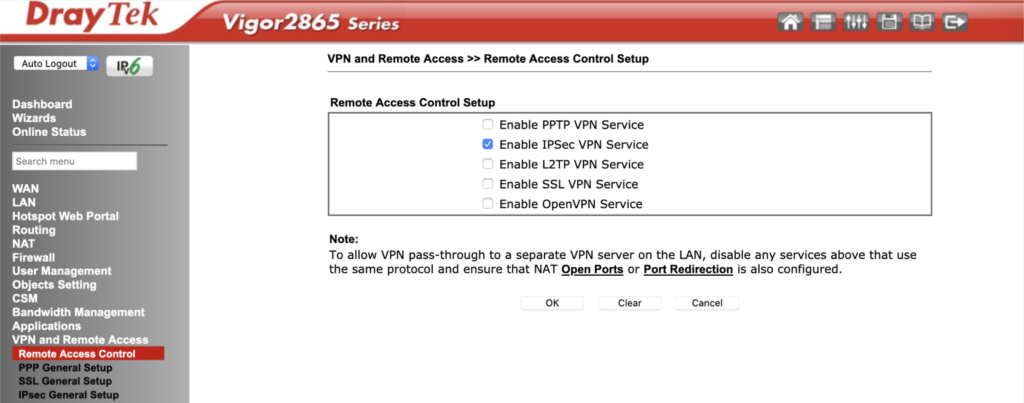
Enable IPsec VPN
Step 3: Add a new Remote Dial-In User
Stay in the VPN and Remote Access menu and go to Remote Dial-In User. Add a new remote access user account by clicking on an unused user in the table:
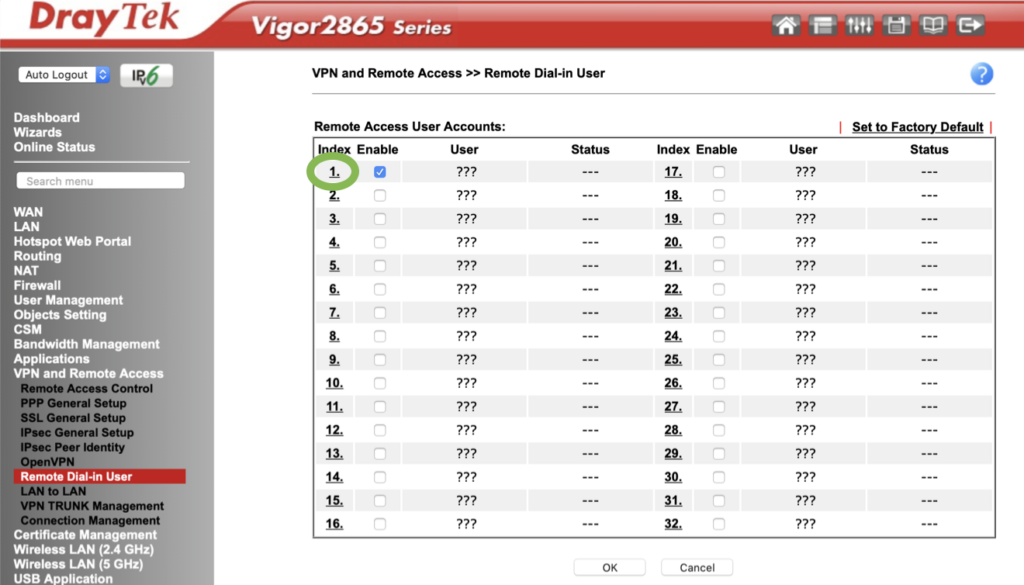
Set up a new user account
Configuration options for DrayTek Vigor IPsec VPN
In the next step, you will see configuration options for the new IPsec VPN tunnel:
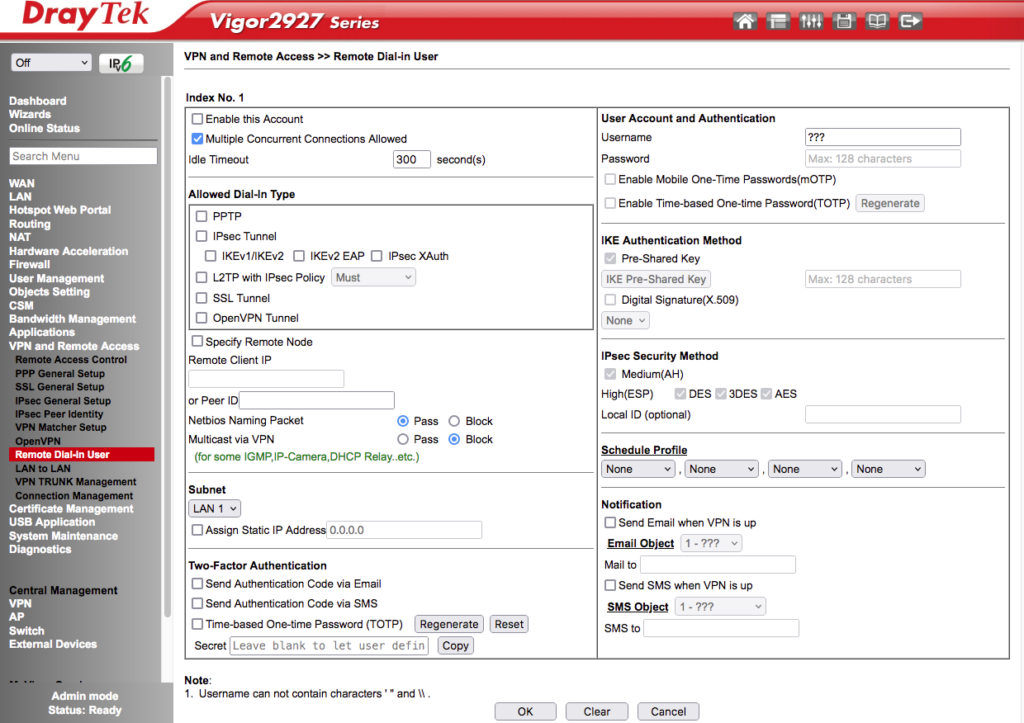
This guide will now take you through three options to configure IPsec VPN on your DrayTek Vigor router:
Configure IPsec VPN with XAuth for a DrayTek Vigor router
Extended Authentication (XAuth) is a practical authentication option for VPN tunnels with multiple users - i.e. in a professional environment. With XAuth, each user has their own login - often the company login - that they can use to connect to the VPN and access the company network remotely.
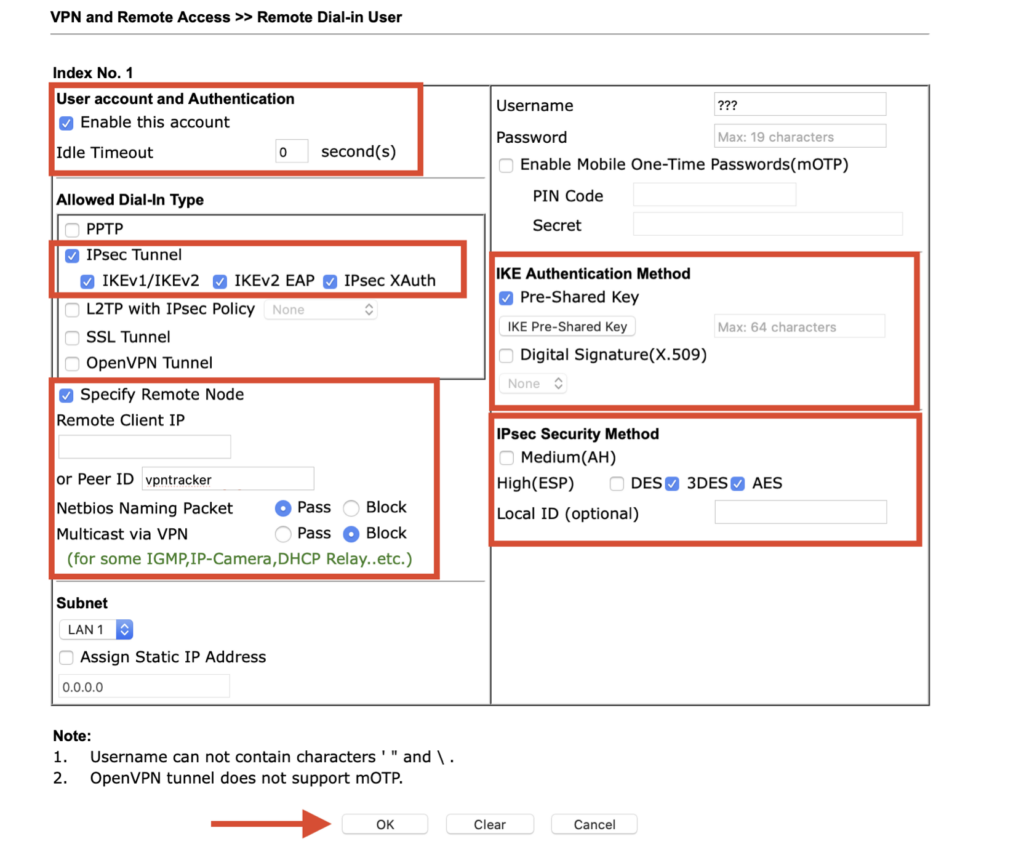
To set up IKEv1 IPsec VPN with XAuth, fill out the following settings for the new VPN:
- Index No. 1: Check Enable this Account
- Allowed Dial-in Type: Check IPsec Tunnel
- User Account and Authentication: Enter a Username and Password - you will need to remember these in order to connect in the VPN client later
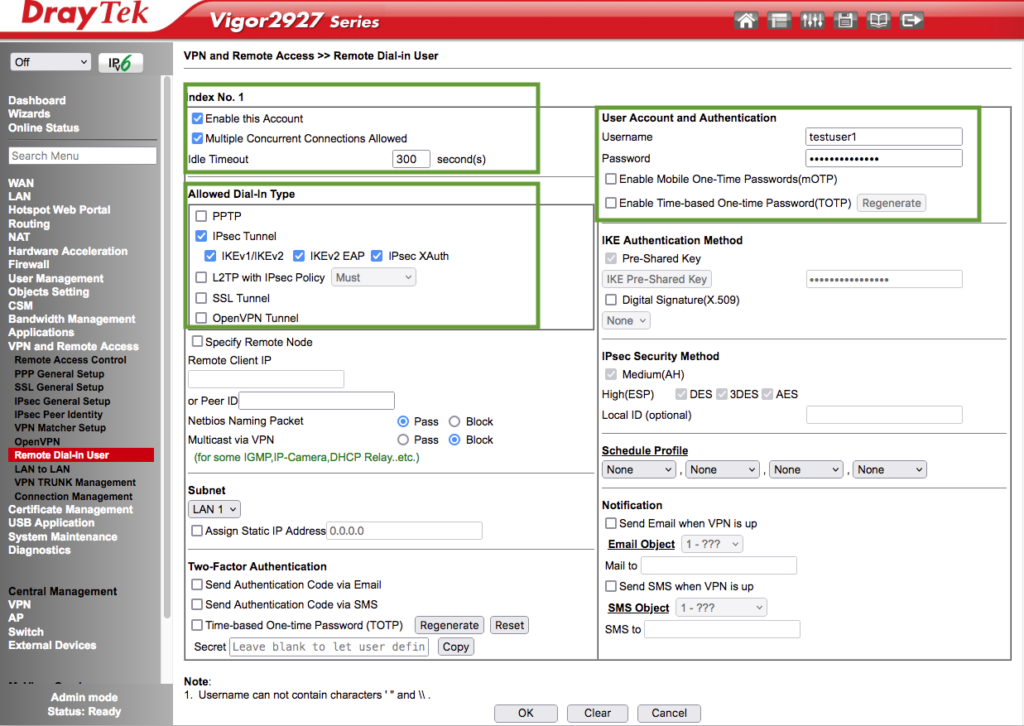
Then, click on OK to save your changes.
Adding a global XAuth Pre-shared Key
In the next step, you will need to set up an XAuth User Pre-shared Key (PSK.) This is a secure connection password which is shared by all users of the VPN tunnel.
To configure the XAuth PSK, go to VPN and Remote Access > IPsec General Setup in the sidebar menu. Then, under IKE Authentication Method, enter your secure password in the field XAuth User Pre-Shared Key:
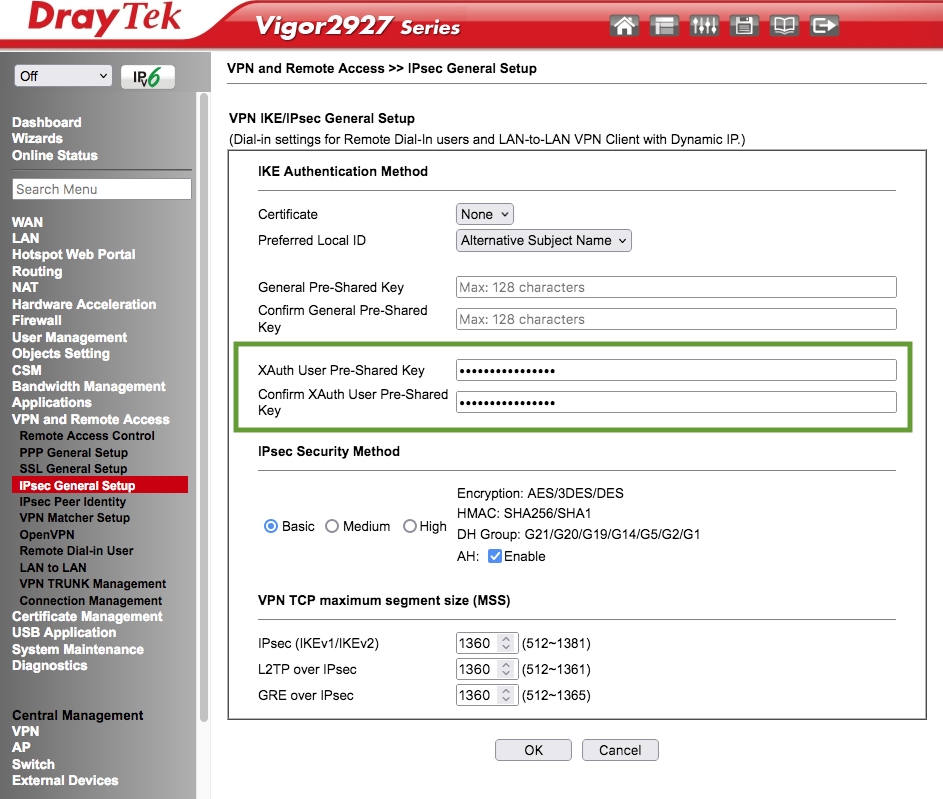
Add your XAuth Pre-shared Key
Click OK to save your changes – you are now ready to connect to your new VPN in the VPN client.
How to connect to DrayTek Vigor IKEv1 IPsec VPN with XAuth
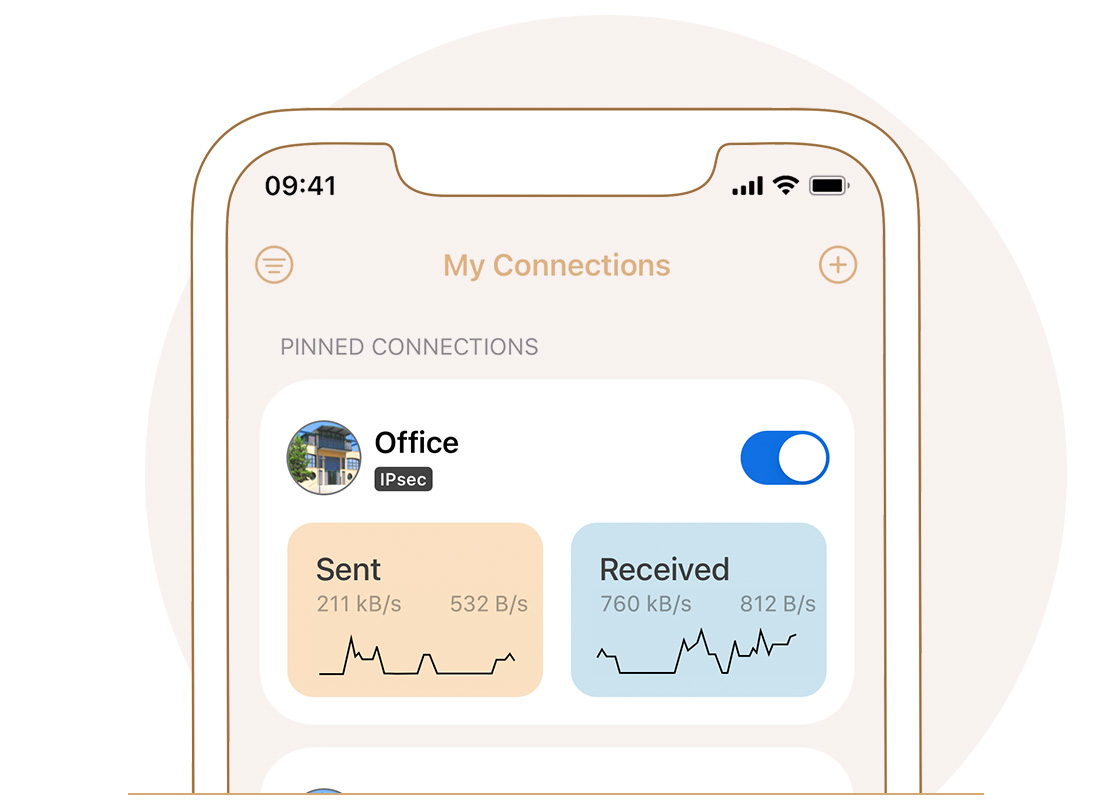
In order to connect to your VPN on your Mac, iPhone, or iPad, you will need a VPN client. VPN Tracker is the best VPN client for macOS and iOS and provides you with secure remote access to your DrayTek Vigor router on all your devices.
The VPN Tracker configuration assistant for DrayTek Vigor helps you set up remote access to your home or office network in seconds. Follow these simple steps to complete VPN setup:
- Open the VPN Tracker Connection Creator for DrayTek Vigor
- Enter your router's IP address or host name, LAN address, XAuth PSK, and your username and password
- Once setup is completed, securely store your new connection in your account for remote access on Mac, iPhone and iPad in VPN Tracker
Configure IKEv2 IPsec VPN for a DrayTek Vigor router
Many DrayTek routers also support IKEv2 VPN - which today is preferred by many users over IKEv1, as it as seen as a faster and more secure option.
To set up IKEv2 IPsec VPN with XAuth, fill out the following settings for the new VPN:
- Index No. 1: Check Enable this Account
- Allowed Dial-in Type: Check IPsec Tunnel
- User Account and Authentication: Enter a Username and Password - you will need to remember these in order to connect in the VPN client later
Then, click on OK to save your changes.
Create a certificate
In order for your IKEv2 connection to work successfully, you will need to create (or import) and sign a certificate on your DrayTek Vigor device.
To do so, go to Certificate Management > Trusted CA Certificate in the sidebar menu, where you can create or import a certificate under the heading X509 Trusted CA Certificate Configuration:

Next, under Modify, click Sign to complete setup:
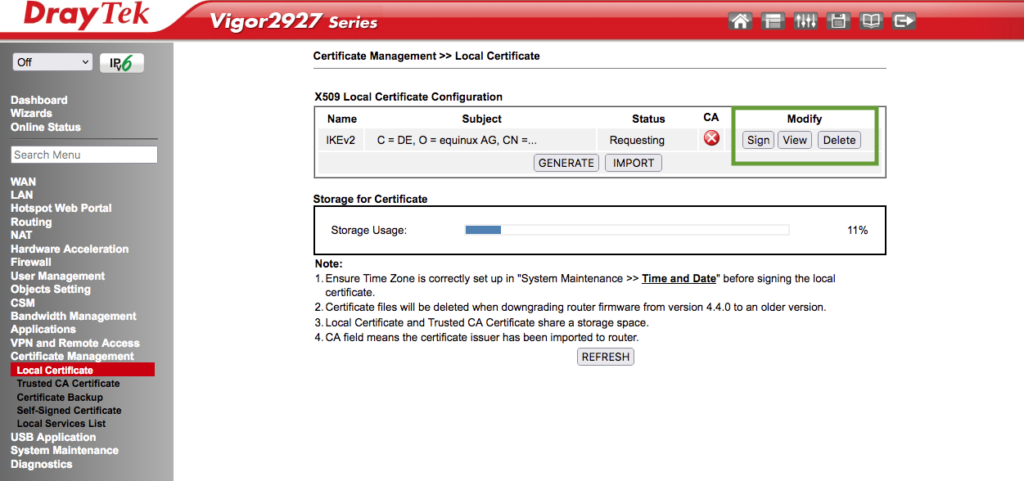
Choose a certificate for IKEv2 setup
Finally, go to VPN and Remote Access > IPsec General Setup in the sidebar menu and under IKE Authentication Method, choose your new certificate (here, name = IKEV2) from the dropdown menu:
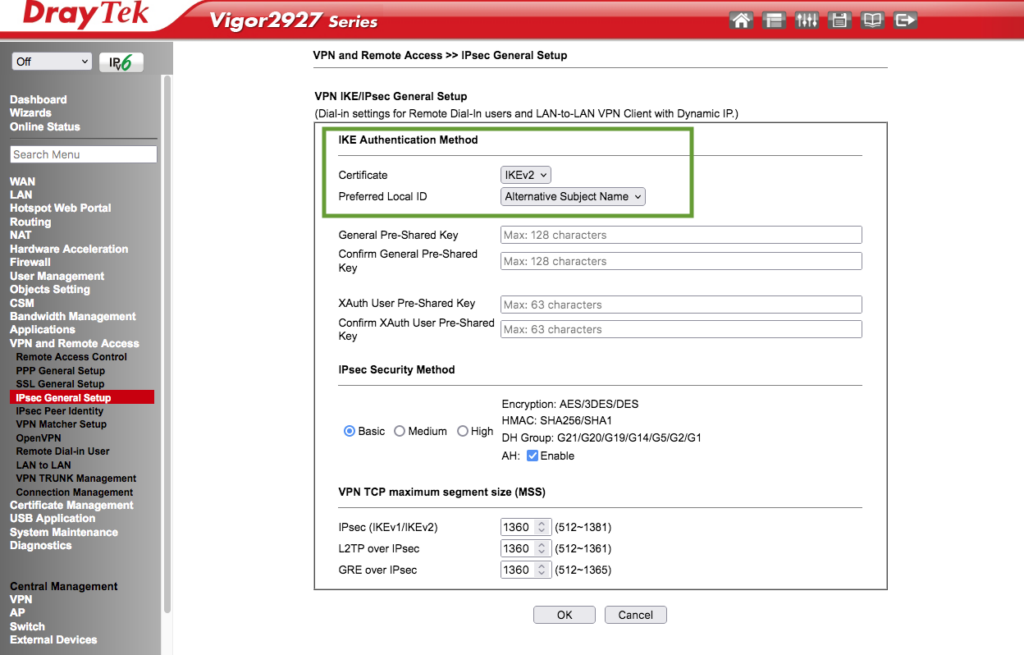
Choose your new certificate for the IKEv2 VPN connection
Click OK to save your changes. You are now ready to connect to your DrayTek IKEv2 VPN in the VPN client.
How to connect to DrayTek Vigor IKEv2 IPsec VPN
In order to connect to your VPN on your Mac, iPhone, or iPad, you will need a VPN client. VPN Tracker is the best VPN client for macOS and iOS and provides you with secure remote access to your DrayTek Vigor router on all your devices.
The VPN Tracker configuration assistant for DrayTek Vigor helps you set up remote access to your home or office network in seconds. Follow these simple steps to complete VPN setup:
- Open the VPN Tracker Connection Creator for DrayTek Vigor
- Enter your router's IP address or host name and your username and password
- Once setup is completed, securely store your new connection in your account for remote access on Mac, iPhone and iPad in VPN Tracker
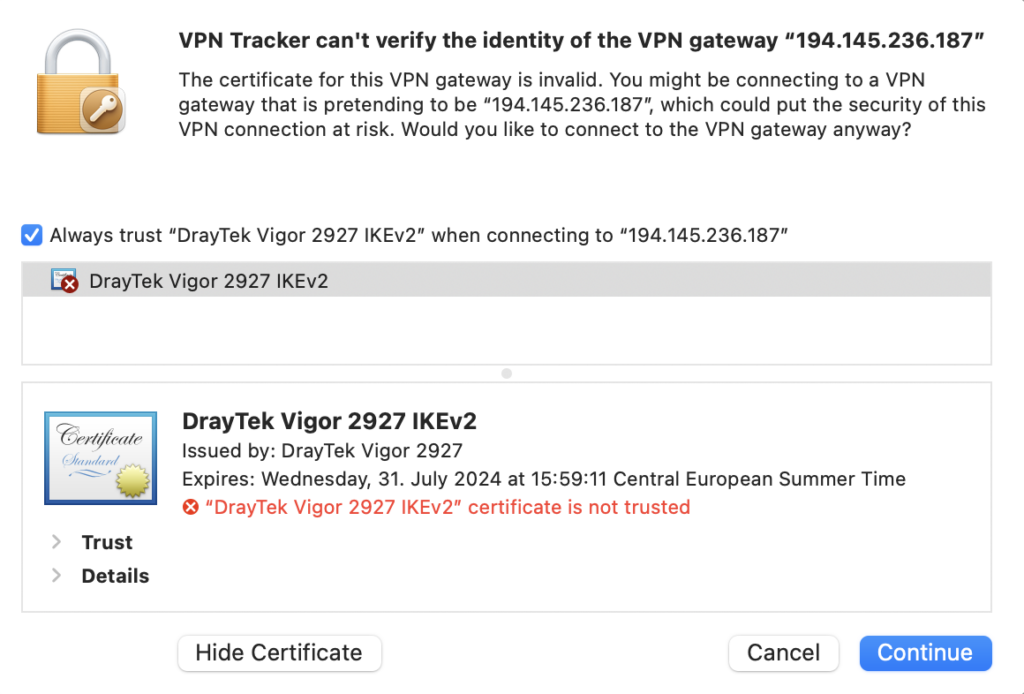
Tip: When you connect to your VPN for the first time in VPN Tracker, you may be shown a certificate warning. To proceed, click Always trust, then enter the system password for your Mac:
Configure an IPsec VPN server for a Legacy DrayTek Vigor router
Some older DrayTek Vigor devices don't support XAUTH for IPsec VPN connections, however, you can still connect to your Vigor router using a Pre-shared Key.
To set up an IPsec VPN tunnel using Pre-shared Key, fill out the following remote access settings for the new user:
- User Accounts and Authentication
- Check the box Enable this account
- Make sure the Idle Timeout is set to 0 seconds
- Allowed Dial-In Type
- Check the box IPsec Tunnel
- If you don’t plan to be using the other options (e.g. PPTP), uncheck them
- Check the box Specify Remote Node
- Peer ID
- Enter an identifier for this connection (e.g. vpntracker) - you will need to enter this later when you connect to your VPN in the VPN client
- IKE Authentication Method
- Check the box Pre-Shared Key and enter a secure password in the pop up window (you will also need to remember this password to authenticate your connection in the VPN client)
- IPsec Security Method
- Uncheck the box Medium (AH)
- High (ESP): We recommend checking 3DES and AES, but not DES. Make sure at least one method is always checked
Add these remote access settings then click OK to save
You are now ready to connect to your new IPsec VPN tunnel in your VPN client!
How to connect to DrayTek Vigor IKEv1 IPsec VPN with PSK
In order to connect to your VPN on your Mac, iPhone, or iPad, you will need a VPN client. VPN Tracker is the best VPN client for macOS and iOS and provides you with secure remote access to your DrayTek Vigor router on all your devices.
The VPN Tracker configuration assistant for DrayTek Vigor helps you set up remote access to your home or office network in seconds. Follow these simple steps to complete VPN setup:
- Open the VPN Tracker Connection Creator for DrayTek Vigor
- Enter your router's IP address or host name, then follow the steps in the wizard and enter the required information for setup
- Once you've completed the wizard, securely store your new connection in your account for remote access on Mac, iPhone and iPad in VPN Tracker
Enter your connection information into VPN Tracker for secure remote access on Mac and iOS
Your VPN Tracker benefits
- Secure remote access to your company network, home office, and Smart Home - all in one app
- Use your own VPN gateway
-
Ready-made profiles for 300+ VPN devices
- Configuration wizard for a smooth and fast setup
- For Mac, iPhone, iPad
- Discover all features