



MikroTik VPN setup with VPN Tracker lets you connect to RouterOS from your Mac, iPhone, or iPad using WireGuard, OpenVPN, or IKEv2. This guide shows how to prepare your MikroTik router as the VPN server or gateway and create the matching connection in VPN Tracker 365.

Use this guide when your MikroTik router is the VPN server or VPN gateway and VPN Tracker is the client used for secure remote access.
Contents
- MikroTik Router Overview
- Supported VPN Tracker Profiles
- Before You Begin
- WireGuard Setup
- OpenVPN Setup
- IKEv2 Setup
- Create the Connection in VPN Tracker
- Test and Troubleshoot
MikroTik Router Overview
MikroTik RouterOS powers a wide range of routers, from compact Wi-Fi and travel-friendly devices to rackmount and Cloud Core Router models. VPN Tracker supports all VPN compatible models, including:
- RB5009UG+S+IN
- hAP ax3
- hAP ax2
- Chateau 5G R17 ax
- CCR2004-16G-2S+PC
- L009UiGS-RM.
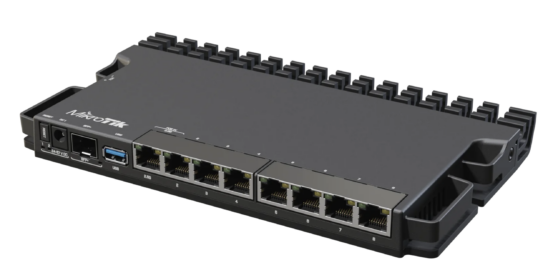
MikroTik RB5009UG+S+IN
These models are listed with RouterOS v7 and support for WireGuard, OpenVPN, and IKEv2. Depending on the model, MikroTik devices can offer features such as Wi-Fi 6, 5G connectivity, multi-gigabit Ethernet, 10G SFP+, PoE, passive cooling, and compact rackmount or desktop designs.
Supported VPN Tracker Profiles
The MikroTik Interop entry currently includes three public, working VPN Tracker profiles:
| Profile | Best for | VPN Tracker shortcut |
|---|---|---|
| WireGuard | Modern RouterOS v7 remote access with lean configuration and strong performance. | Create MikroTik WireGuard connection |
| OpenVPN | Environments that already use OpenVPN profiles, certificates, or an established OpenVPN process. | Create MikroTik OpenVPN connection |
| IKEv2 | Certificate-based IPsec remote access with RouterOS mode-config and policy-based routing. | Create MikroTik IKEv2 connection |
If you are not sure which profile to use, start with the general MikroTik connection creator and select the profile that matches your RouterOS configuration: Create MikroTik VPN connection.
Before You Begin
Before creating the VPN connection in VPN Tracker, make sure the MikroTik side is reachable from the internet and that you have the required VPN settings available.
- Admin access to RouterOS via WinBox or the RouterOS web interface.
- A public IP address, a working DNS name, or MikroTik DDNS for the router.
- Firewall and NAT rules that allow the selected VPN protocol from the internet.
- The MikroTik LAN subnet you want to reach, for example 192.168.88.0/24.
- VPN Tracker 365 installed on the Mac, iPhone, or iPad that will connect remotely.
- For certificate-based setups, the required CA, client certificate, private key, and passphrases.
WireGuard Setup
WireGuard is the recommended starting point for many new MikroTik RouterOS v7 VPN setups. RouterOS includes a dedicated WireGuard interface and peer configuration. VPN Tracker can create a matching WireGuard connection using the values from the MikroTik peer configuration.
- In RouterOS, create a WireGuard interface and note its listen port.
- Add an IP address to the WireGuard interface, using a VPN subnet that does not overlap with your local network.
- Create a peer for the VPN Tracker device. Use one peer per Mac, iPhone, or iPad.
- Set the peer allowed address to the VPN client address, for example 10.10.10.2/32.
- Add firewall rules that allow incoming WireGuard traffic to the router and allow forwarding from the WireGuard subnet to the LAN.
- If the MikroTik router is behind NAT, configure port forwarding on the upstream router.
In VPN Tracker, create the MikroTik WireGuard profile and enter the router hostname, WireGuard port, public key, private key, client address, and the remote networks you want to access.
OpenVPN Setup
Use OpenVPN when your MikroTik router is already configured for OpenVPN, when you need to follow an existing OpenVPN certificate workflow, or when an exported OpenVPN configuration is available.
- Prepare the required certificates in RouterOS.
- Configure the OpenVPN server profile, address pool, authentication, and encryption settings.
- Create a PPP secret or user entry for the VPN Tracker user.
- Allow the OpenVPN server port through the MikroTik firewall.
- Export or collect the OpenVPN settings needed by the client, including server address, port, protocol, certificates, username, and password.
In VPN Tracker, create the MikroTik OpenVPN profile and import the available OpenVPN file or enter the values manually. Check that the remote network route points to the MikroTik LAN subnet you want to access.
IKEv2 Setup
Use IKEv2 when your MikroTik VPN setup is based on IPsec and certificates. This is a good fit for teams that already manage RouterOS IPsec identities, policies, and certificates centrally.
- Create or import the CA, server certificate, and client certificate in RouterOS.
- Configure an IPsec profile and proposal that match your security requirements.
- Create a mode-config address pool for VPN clients.
- Create the peer and identity for IKEv2 remote access.
- Allow IKEv2/IPsec traffic through the firewall, including UDP 500, UDP 4500, and ESP where applicable.
- Export the client certificate and collect the server hostname, remote ID, local ID, and remote network settings.
In VPN Tracker, create the MikroTik IKEv2 profile and enter the gateway address, IDs, authentication settings, certificates, and remote networks from your RouterOS setup.
Create the Connection in VPN Tracker
Once RouterOS is ready, create the matching connection in VPN Tracker 365.
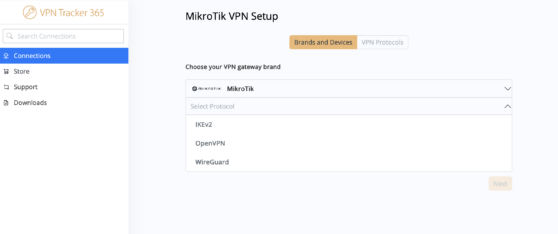
- Open the MikroTik connection creator: Create MikroTik VPN connection.
- Select the profile that matches your RouterOS setup: WireGuard, OpenVPN, or IKEv2.
- Enter the router hostname or public IP address.
- Add the authentication material required for the selected profile.
- Review the remote network route. Use your real MikroTik LAN subnet, for example 192.168.88.0/24.
- Save the connection in VPN Tracker and store secrets securely.
Testing and Troubleshooting Your MikroTik VPN Setup
Test from outside the MikroTik LAN, for example through a mobile hotspot. Connect in VPN Tracker, then try to reach the MikroTik router address and one internal host on the remote network.
The VPN does not connect
Check the public hostname, firewall rules, and protocol-specific ports first. If the router is behind another router, confirm the upstream port forwarding points to the MikroTik WAN or management address.
The VPN connects, but the LAN is not reachable
Check the remote network route in VPN Tracker and the RouterOS firewall forward rules. The VPN client subnet and the MikroTik LAN subnet must not overlap.
WireGuard connects only one device
Create a separate WireGuard peer for each VPN Tracker device. Reusing the same WireGuard peer on multiple devices can cause confusing traffic and key behavior.
IKEv2 certificate authentication fails
Check that the certificates are trusted, not expired, and assigned to the correct RouterOS IPsec identity. Also verify that local ID and remote ID values in VPN Tracker match the RouterOS configuration.
Ready to connect your MikroTik VPN?
Create a secure MikroTik VPN connection for WireGuard, OpenVPN, or IKEv2 and save it in VPN Tracker 365 for Mac, iPhone, and iPad.