need help with your FortiGate VPN setup, this guide will walk you through the process step-by-step. Fortinet’s FortiGate Next Generation Firewalls offer powerful protection for businesses of all sizes, with advanced security features that defend against both internal and external threats. With built-in support for IPsec, IKEv2, and SSL VPN connections, plus a range of models to suit different needs, FortiGate firewalls are a trusted choice for secure remote access.
In this guide, you’ll learn how to complete your FortiGate VPN setup step-by-step — including key specs for the FortiGate 40F — and how to connect via IPsec, IKEv2, and SSL VPN on your Mac, iPhone, or iPad.
Menu
IPsec vs SSL VPN
When it comes to FortiGate VPN Setup, users have the choice between IPsec and Fortinet SSL VPN, both of which are fully supported in VPN Tracker for Mac and iOS.
Generally, we would recommend using IPsec VPN wherever possible, as it provides faster connection speeds and is more stable. However, SSL VPN is compatible in more network locations - making it a good fallback choice when IPsec is not available (i.e. due to network restrictions.) Overall, both standards are considered equally secure for your business. Learn more →
This guide explains step-by-step how to configure both IPsec and SSL VPN on your FortiGate firewall, as well as how to set up your VPN in VPN Tracker and get connected on Mac, iPhone and iPad.
FortiGate VPN Setup: Configure IKEv2 VPN
Step one: Determine address range for VPN
On your FortiGate firewall, go to Policy & Objects > Addresses and add a new address. Make sure IP Range is selected in the dropdown, then add the address range that is to be used for the new VPN:
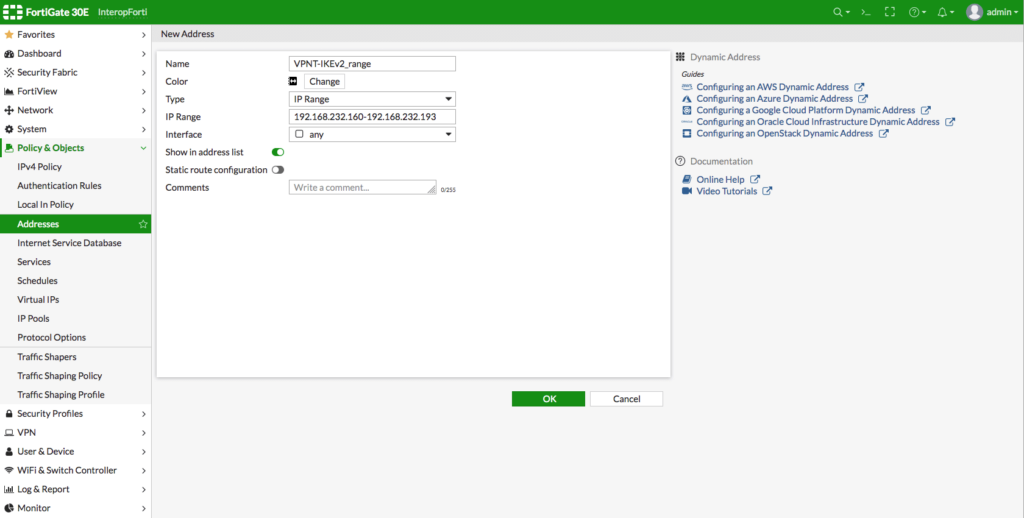
Add a new IP address range to be used with the VPN
Step two: Create a new VPN User
Next, you need to set up a user account for the individual(s) who will be connecting to the VPN. To do so, go to User & Authentication > User Definition and create a new Local User:
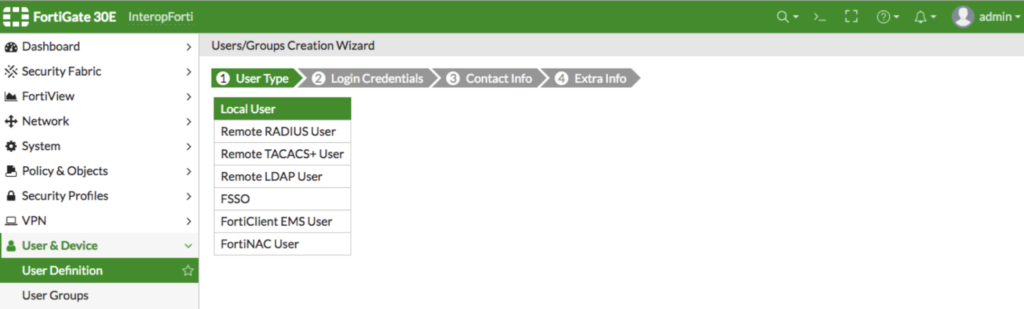
Create a new user with type 'Local User'
You can now configure login credentials for the new user.
Important: Make sure to make a note of the username and password, as this will be the login you use to access the VPN later in the VPN client.
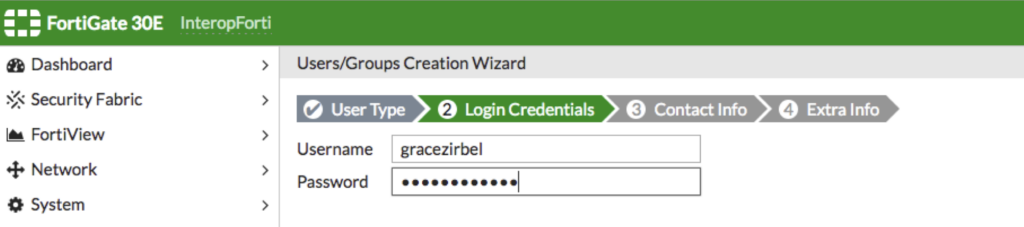
Set up your username and password
Next, add contact info for the user if desired (i.e. company email address.)
In the next step, ensure the user account status is set to Enabled, then select a User Group for the new user. This is used to determine VPN access and permissions.
You can select an existing group, or click the + to create a new one
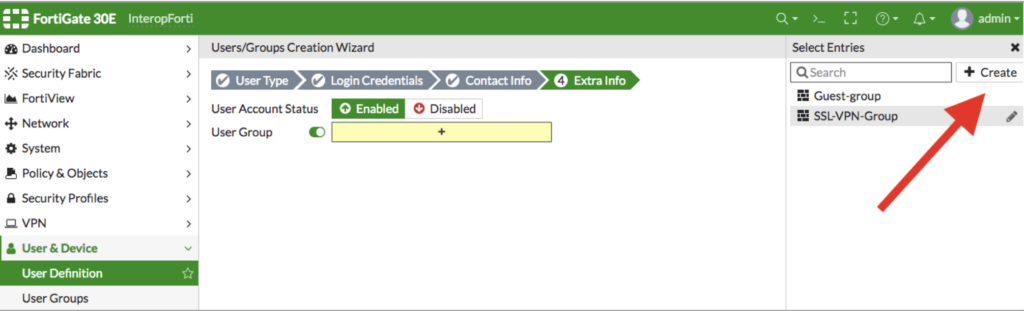
Select or create a new user group for the new user
Give the new User Group a name and select Firewall as the type:
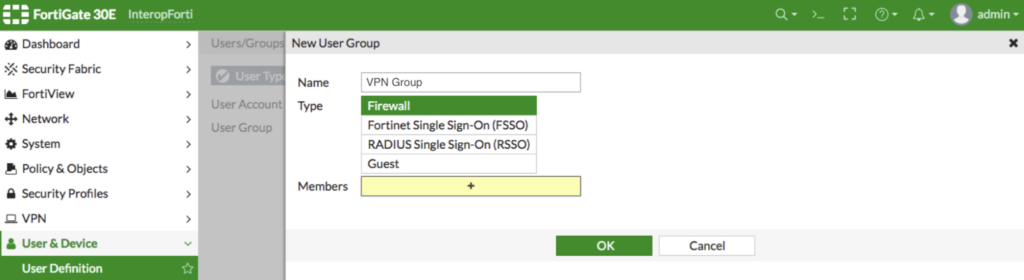
Create a new User Group with type 'Firewall'
Select the new User Group from the list in the right menu bar and click Save to complete setup. You can repeat these steps for any users who will be connecting to the VPN (i.e. other staff members) and add them to the new User Group.
Step three: Create a new IPsec tunnel
Next, in the sidebar, go to VPN > IPsec Tunnels and click the + to create a new IPsec Tunnel:
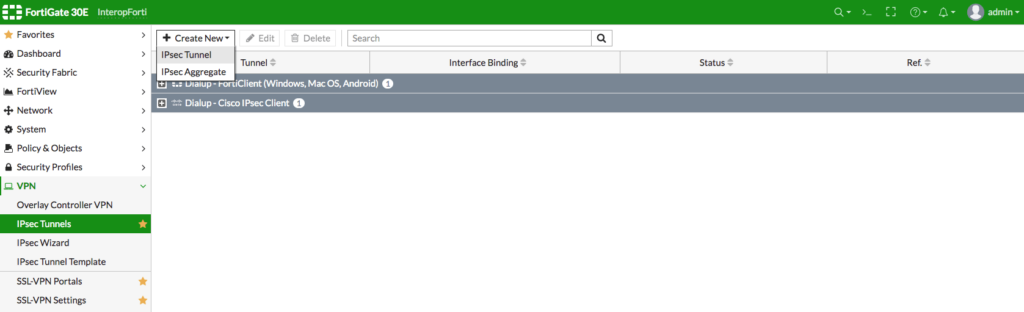
Create a new IPsec tunnel
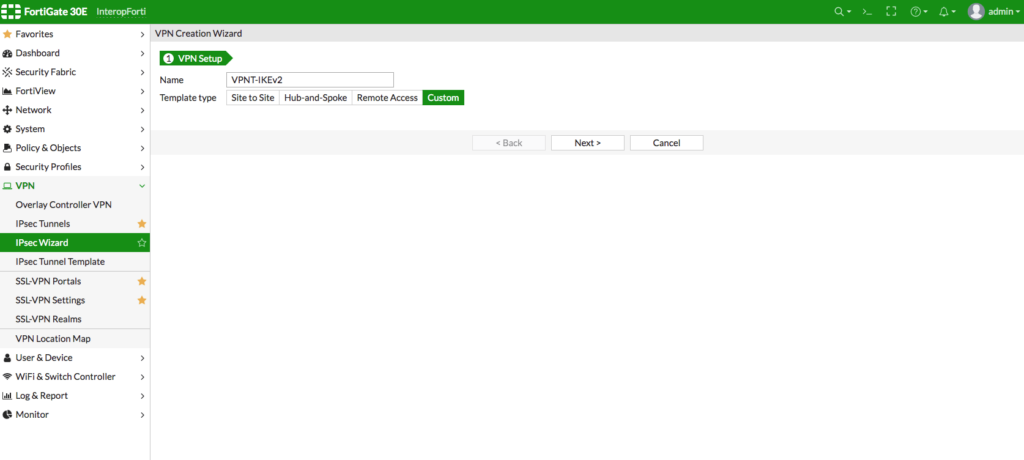
In step 1, choose "Custom" as template type:
Settings
You can now enter the following settings for your new VPN tunnel:
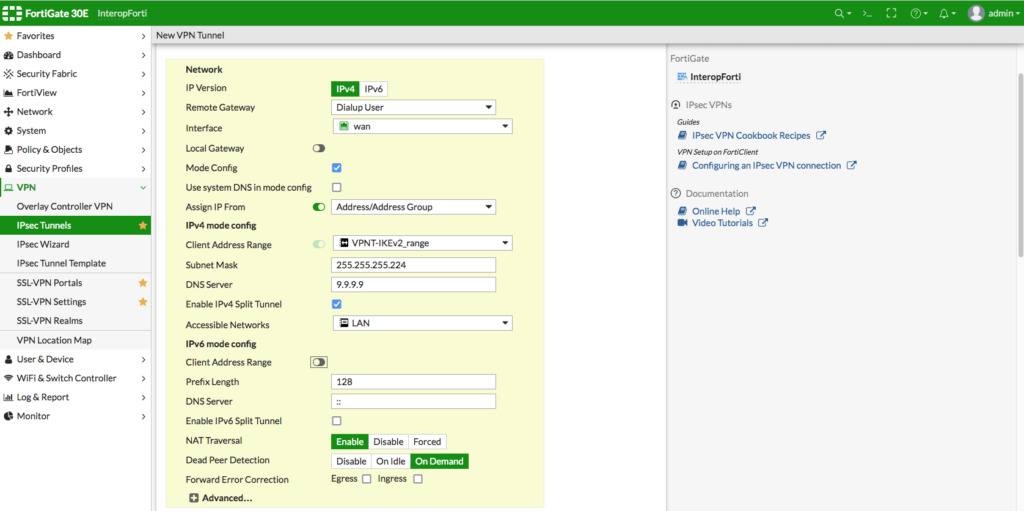
Enter the settings for your new VPN tunnel
- For Remote Gateway, select Dialup User from the dropdown menu
- For Interface, select wan
- Enable Mode Config, then "Assign IP From" > Address/Address Group
- Under Client Address Range, select the IP range you created in the previous step
- In the next fields, add the Subnet Mask and DNS Server for your network
- Then, enable IPv4 Split Tunnel and select the networks which users should be able to access via the VPN (i.e. LAN)
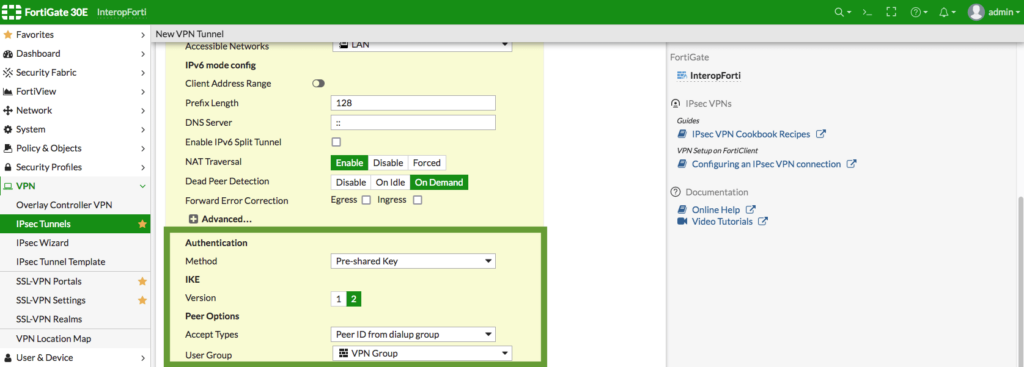
Authentication
- Choose Pre-shared Key as your authentication method
- Then, for IKE Version, choose 2
- Peer options
- Accept Types: Choose Peer ID from dialup group
- Select the User Group containing the user(s) you set up earlier
Phase 1 & Phase 2 settings
For the next step, match up your Phase 1 & 2 settings with those shown in the screenshot:
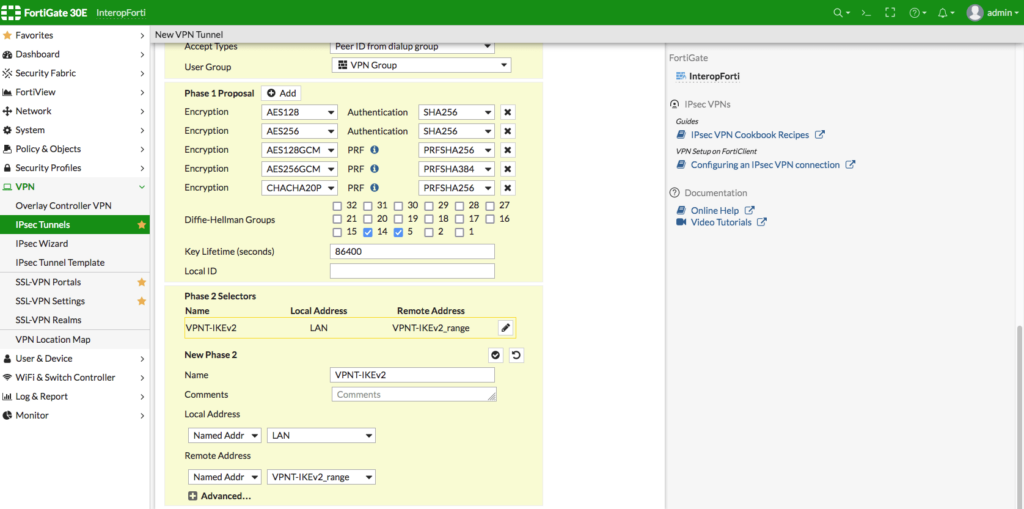
Configure your Phase 1 & 2 settings
Please note, if you choose to deviate from these settings, your configuration in VPN Tracker must be updated to match in order for your connection to work.
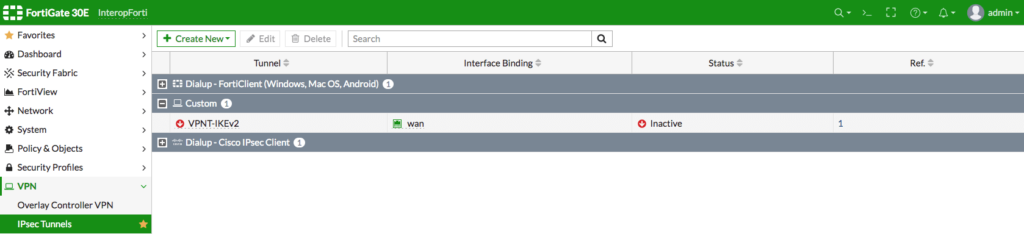
Finally, click OK to save the new VPN tunnel:
Step four: Create new IPv4 policy
Go to Policy & Objects > IPv4 Policy in the sidebar and click the + to create a new policy:
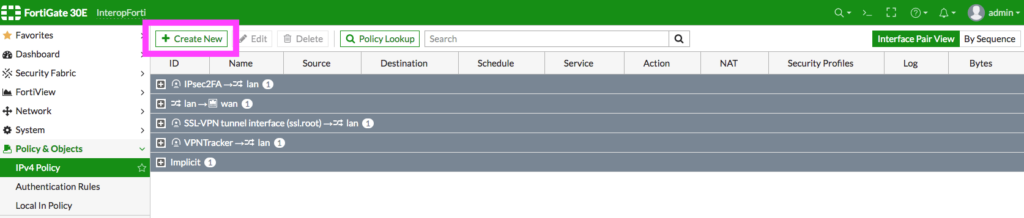
Click to add a new IPv4 policy
Give your new policy a name, then, configure the rules to match those in the screenshot:
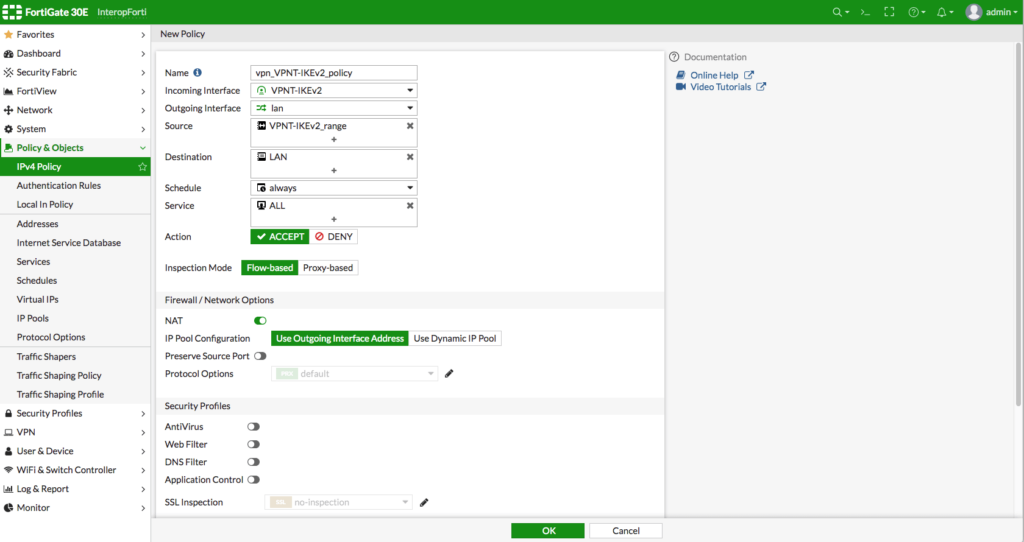
Add these policy rules
Click OK to save your changes.
Connect to FortiGate IKEv2 IPsec VPN on Mac, iPhone, iPad
Once you've configured your IKEv2 Fortigate VPN setup, all you need is a VPN client to get connected to your FortiGate firewall. VPN Tracker is the best remote access solution for secure remote access on Mac, iPhone and iPad and works great with Fortinet FortiGate firewalls.
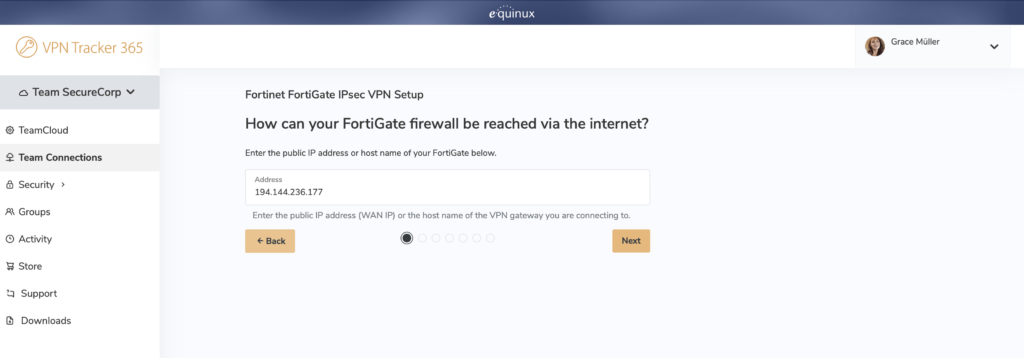
- Open the VPN Tracker FortiGate connection creator
- Enter the WAN IP address (or hostname) of your FortiGate device (you can find this on your FortiGate device under Network > Interfaces)
- Follow the steps in the wizard and enter your connection details as prompted
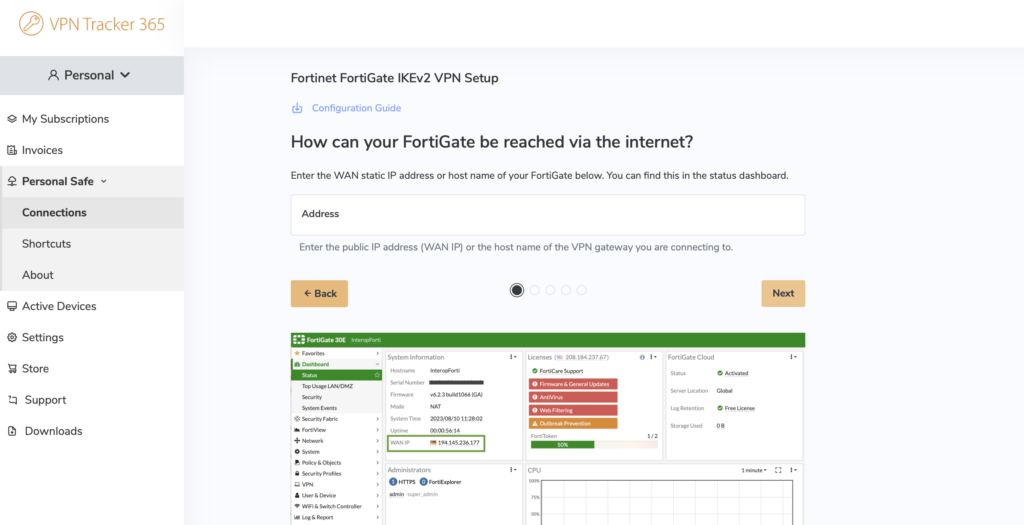
VPN Tracker setup wizard for FortiGate IKEv2 VPN
When finished, securely save your connection in your VPN Tracker account so you can get connected to your IKEv2 FortiGate VPN Setup in VPN Tracker on Mac, iPhone and iPad!
FortiGate VPN Setup: Configure IPsec VPN
Please note, this guide applies to FortiGate firewalls running FortiOS 6.2.3 or newer. If you are using an older firmware version, check out our legacy guides.
For your FortiGate VPN Setup with an IPsec tunnel on your FortiGate firewall, first open the web interface of your device - this can usually be reached from the trusted network (LAN) of the device - then, carry out the following steps:
Step 1: Retrieve network information
You will need to make a note of certain network information to enter into the VPN client when you connect to your Fortigate VPN setup later. You can find this information under Network > Interfaces.
Within the network overview, make a note of:
- WAN address* (your device's public address, i.e. how your device is accessed via the internet)
- LAN address (your device's local network, i.e. the network you're connecting to via the VPN tunnel)
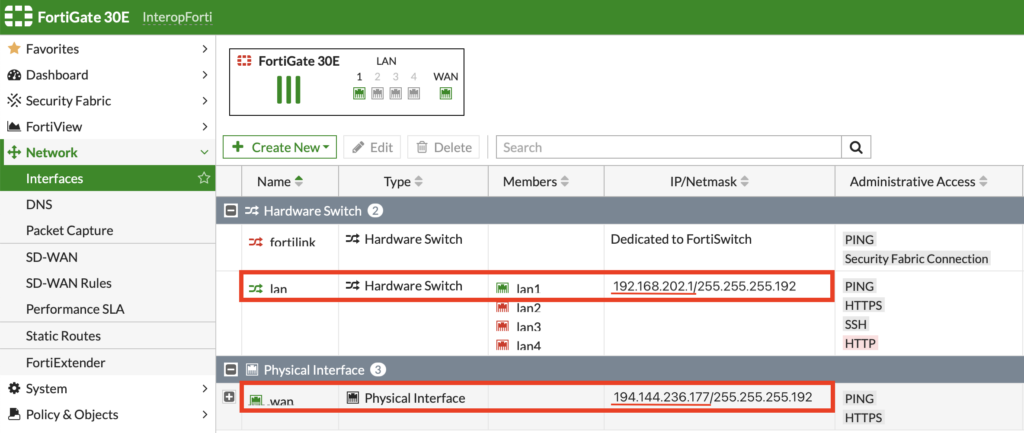
Locate the WAN and LAN address of your FortiGate firewall
* If your device has a DNS hostname, use this in place of the WAN address.
Step 2: Create VPN Users
Next, you need to set up a user account for the individual(s) who will be connecting to the VPN. To do so, go to User & Authentication > User Definition and create a new Local User:

Create a new user with type 'Local User'
You can now configure login credentials for the new user. This will be the login you use to access your Frigate VPN Setup later in the VPN client.

Set up your username and password
Next, add contact info for the user if desired (i.e. company email address.)
In the next step, ensure the user account status is set to Enabled, then select a User Group for the new user. This is used to determine VPN access and permissions.
You can select an existing group, or click the + to create a new one:
Select or create a new user group for the new user
Give the new User Group a name and select Firewall as the type:

Create a new User Group with type 'Firewall'
Select the new User Group from the list in the right menu bar and click Save to complete setup:
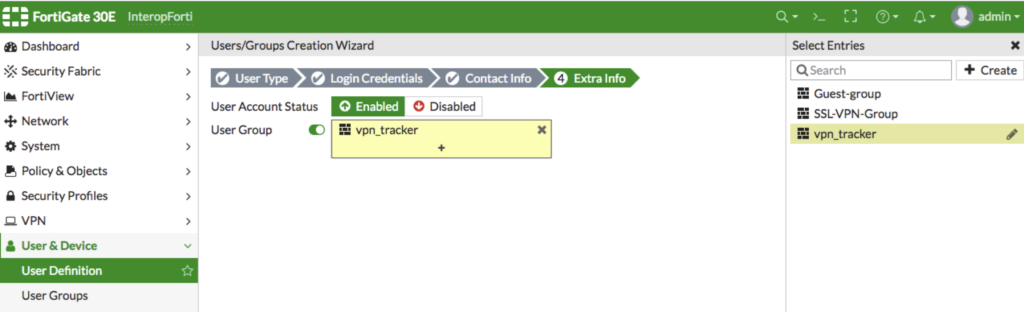
Select the new User Group then click save
You can repeat these steps for any users who will be connecting to the FortiGate VPN Setup (i.e. other staff members) and add them to the new User Group.
Step 3: Set up an IPsec VPN tunnel
Once you've set up all your users, you can configure the IPsec VPN tunnel.
Go to VPN > IPsec Tunnels and create a new tunnel. The template type is Remote access and for Remote device type, choose Client-based and select Cisco:
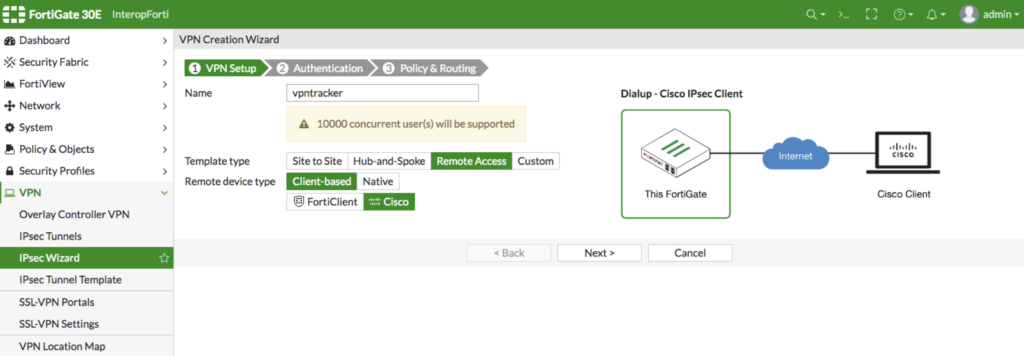
Set up a new VPN tunnel with the following properties
In the next step, select wan as the Incoming Interface.
Then, set Pre-shared key for the Authentication method. Enter a secure password and make a note of this as you will need it to connect to the VPN later.
By User Group, select the group you set up in the previous step (i.e. vpn_tracker)
Optional: Check the box Require ‘Group Name’ on VPN client if it is likely you will be connecting to more than one VPN tunnel, then enter a Group Name of your choice.
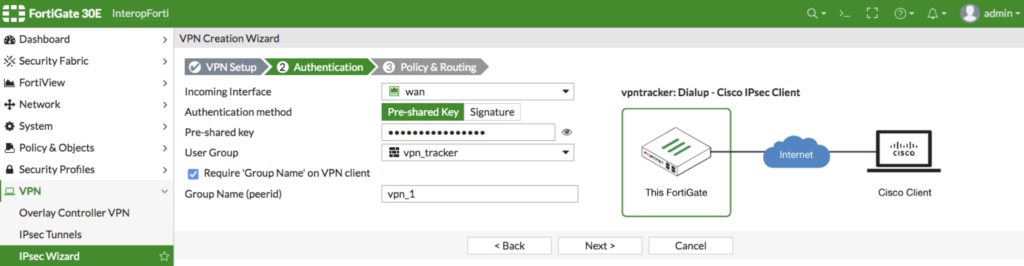
Enter the authentication information for your VPN tunnel as described
In the final step, you can specify your network information (i.e. the network you will be connecting to via the VPN tunnel.)
For Local interface, select lan, then choose a Local Address from your list (here, we have simply selected all)
By Client Address Range, enter the network range that is to be used for your VPN connection e.g. 192.168.232.1-192.168.232.254.
A note on DNS:
Here you have the choice to use the gateway's DNS server or specify your own DNS server. Whichever option you choose here needs to match up to the settings you enter in the VPN client in the next step.
Click Create to set up your new VPN tunnel:
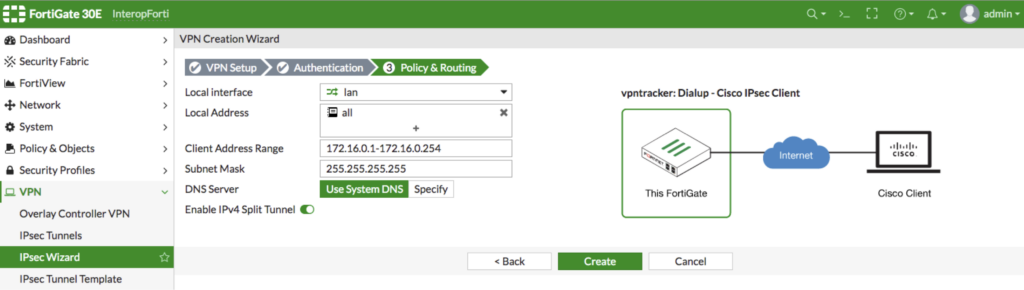
Fill out the network settings for the new VPN tunnel
Connect to FortiGate IPsec VPN on Mac, iPhone, iPad
Once you've configured your FortiGate VPN Setup using IPSec, all you need is a VPN client to get connected to your FortiGate firewall. VPN Tracker is the best remote access solution for secure remote access on Mac, iPhone and iPad and works great with Fortinet FortiGate firewalls.
- Open the VPN Tracker FortiGate IPsec connection creator and create a free account
- Enter the WAN IP address (or hostname) of your FortiGate device, then follow the remaining steps in the connection assistant
- Once you've completed the setup wizard, securely save your connection to your account using end-to-end encryption
Follow the connection wizard to connect to your FortiGate VPN Setup
You can now connect to your FortiGate IPsec VPN in VPN Tracker on Mac, iPhone and iPad!
FortiGate VPN Setup for SSL VPN
An SSL VPN tunnel provides users with secure remote access to a FortiGate firewall.
For your FortiGate VPN Setup using SSL, log in to the web interface - this can usually be reached from the trusted network (LAN) of the device - then, carry out the following steps:
Step 1: Retrieve network information
You will need to make a note of certain network information to enter into the VPN client when you connect to your VPN later. You can find this information under Network > Interfaces.
Within the network overview, make a note of:
- WAN address* (your device's public address, i.e. how your device is accessed via the internet)
- LAN address (your device's local network, i.e. the network you're connecting to via the VPN tunnel)
Locate the WAN and LAN address of your FortiGate firewall
* If your device has a DNS hostname, use this in place of the WAN address.
Step 2: Set up the SSL tunnel
Go to the VPN tab and select SSL-VPN Portals. Then, click Create new to start setting up a new SSL-VPN Portal
Under Tunnel Mode, click the slider to Enable Split Tunneling and choose the network ranges your VPN users need to have access to (i.e. lan):
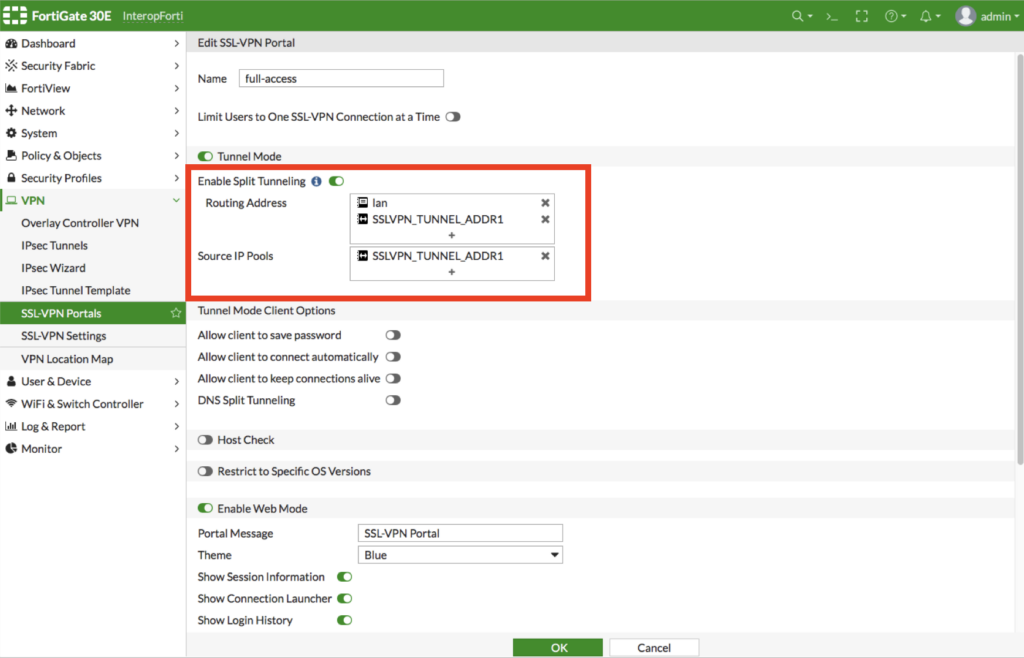
Enter the network ranges VPN users should have access to
Click OK to save your settings and create the new SSL-VPN Portal.
Step 3: Configure VPN users
VPN users are the individuals who will have access to the SSL VPN tunnel.
To set up a new user, go to User & Device > User Definition and create a new Local User:
Create a new user with type 'Local User'
In the next step, create a Username and Password. Make a note of these credentials as you will need them to log in to the VPN later.
Finally, add contact info if desired (i.e. company email address) then either select an existing User Group or create a new one by clicking the + icon. If you're creating a new User Group, select Firewall as the Type:
Create a new User Group with type 'Firewall'
Once you've added the new User Group, add the new VPN user to it and save to complete setup.
Repeat these steps for any additional VPN users you wish to add (i.e. staff members.)
Connect to FortiGate SSL VPN on Mac, iPhone, iPad
Once you've completed your FortiGate VPN Setup using SSL, all you need is a VPN client to get connected to your FortiGate firewall. VPN Tracker is the best remote access solution for secure remote access on Mac, iPhone and iPad and works great with Fortinet FortiGate firewalls.
- Open the VPN Tracker FortiGate SSL connection creator
- Enter the WAN IP address (or hostname) of your FortiGate device, then follow the remaining steps in the connection assistant
- Once you've completed the setup wizard, securely save your connection to your account using end-to-end encryption
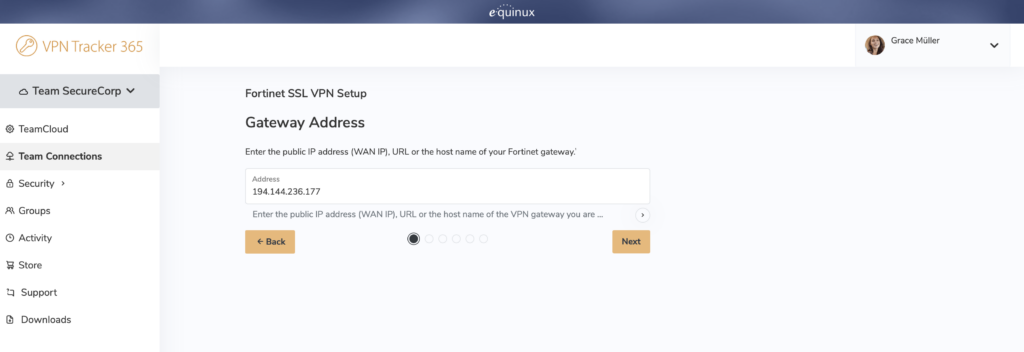
Follow the configuration wizard to connect to Fortinet SSL VPN
You can now connect to your FortiGate VPN Setup using SSL VPN in VPN Tracker on Mac, iPhone and iPad!
Before You Head Back to the Office: Your VPN Tracker Checklist for Mac & iOS
You've mastered the Fortigate VPN setup and set up VPN Tracker — great! But before Monday morning, there are a few important checks you can carry out to ensure a smooth return to the office. Following these steps helps you avoid last-minute connection issues and keeps your devices ready for work.
1. Confirm Your VPN Tracker Connection
- Make sure VPN Tracker shows Connected
- Test access to internal resources like file shares, intranet, or email servers. (These are the systems you normally access at work.)
- Check for any error messages in VPN Tracker and note them for IT support or the VPN Tracker support team if needed
2. Update & Secure Your Devices
- Ensure your Mac or iOS device is running the latest software updates. (Updates often fix security and connectivity issues)
- Verify that VPN Tracker is up to date to avoid bugs or compatibility issues. Go to VPN Tracker 365 > Check for Updates
- Firewall or antivirus settings can sometimes block VPN Tracker from connecting. Make sure both macOS built-in protections and any third-party security apps allow VPN Tracker to run. This ensures a stable connection before heading back to the office
3. Test Your Network
- Check that your home Wi-Fi or mobile connection is stable.
- If you have multiple networks, test your backup connection to stay connected if one fails
- Verify any split-tunneling settings or network preferences in VPN Tracker so you can access office resources without issues. (Split tunneling allows some traffic to go through VPN Tracker while other traffic uses your regular internet.)
4. Verify Credentials & Access
- Ensure your VPN Tracker login credentials are correct and working
- Test user authentication in VPN Tracker to avoid last-minute lockouts on Monday
- Note any issues and contact IT support proactively rather than waiting for Monday morning
5. Check VPN Tracker on Your Other Devices
- Remember to download and install VPN Tracker for iOS on your iPhone or iPad if you haven’t already
- Verify that your mobile devices can connect to your office network through VPN Tracker, so you’re fully prepared for returning to the office
Your VPN Tracker benefits
- Secure remote access to your company network, home office, and Smart Home - all in one app
- Use your own VPN gateway
- Ready-made profiles for 300+ VPN devices
- Configuration wizard for a smooth and fast setup
- For Mac, iPhone, iPad
- Discover all features